Web3 Mobile App Development: Build Crypto Apps 2026 Guide
What you'll build in this web3 mobile app guide
A web3 mobile app is a native iOS or Android product that connects wallets, smart contracts, tokens, NFTs, and mobile user experience into one flow, so users can hold assets, sign transactions, view collectibles, and use blockchain features from a phone.
In this guide, you will plan a beginner-friendly crypto app from first screen to launch. You will choose a wallet model, pick mobile tooling, build core crypto actions, reduce gas and signing friction, review security, and prepare for app-store submission.
The contrarian lesson for 2026 is simple: the best crypto mobile products do not start by adding every swap, staking, and NFT feature. They first remove avoidable confusion. Passkeys, account abstraction, fiat onboarding, clear recovery, and readable signing screens usually reduce drop-off more than another DeFi integration.
Use the original 3-layer compatibility check in this guide before choosing any SDK: confirm chain support, mobile framework support, and distribution policy support. Then use the three-line clarity test before launch: every transaction screen should explain the action, the fee, and the risk in three plain-language lines.
Who this guide is for
You do not need to be a Solidity expert to use this guide. It is written for founders scoping a first crypto product, product managers turning Web3 ideas into user stories, beginner developers with some mobile experience, and Web2 teams moving into crypto.
If you have shipped a normal app before, many decisions will feel familiar. The blockchain layer adds custody, signing, gas, compliance, and irreversible transactions, so your design work has to be more careful than a standard social or commerce app.
What makes mobile different from web
A web3 mobile app is not just a smaller browser dapp. Apple's app review rules and google play policies affect NFT sales, in-app digital goods, financial disclosures, and external payment links. Review Apple's section 3.1.1 before you design monetization (apple app review guidelines, accessed Jan. 2026).
Mobile also changes the user interface. Wallet addresses must fit on small screens, signing prompts arrive through deep links or push notifications, and biometric checks often become the main local security gate. Users also expect the app to survive weak mobile data without losing state.
Andreas Antonopoulos, author and educator known for Mastering Bitcoin, has spent years teaching that cryptographic security and everyday usability often pull in opposite directions. That tension is strongest on mobile, where users expect fast taps but blockchain actions can be permanent.
Prerequisites: gather your web3 mobile app toolkit
Before you write code, set up the tools that will decide how fast you can test. Skipping this step usually creates mid-sprint delays when a wallet SDK lacks mobile support or a chain has no working faucet.
- Framework: react native, flutter, or native iOS and Android.
- Wallet SDK: walletconnect appkit, privy, shifting, thirdweb, or another provider that supports your target chain.
- RPC provider: alchemy, infura, quicknode, or a self-managed node endpoint with failover.
- Testnet funds: faucet tokens for sepolia, base sepolia, arbitrum sepolia, or your chosen network.
- Smart contracts: verified testnet contract addresses and ABIs stored in your project.
- Analytics: product analytics for in-app events and a block explorer or on-chain dashboard for transactions.
- Security tools: static analysis, dependency scanning, jailbreak and root checks, and an audit plan.
- App-store accounts: apple developer program at $99 per year (apple developer support, accessed Jan. 2026) and google play developer registration at a $25 one-time fee (google play console help, accessed Jan. 2026).
Choose a cross-platform framework
React native is the safest default for many web3 mobile app teams in 2026 because wallet and account SDKs tend to publish mobile examples for it first. It also lets a TypeScript team share validation, contract calls, and formatting logic across web and mobile.
Flutter can work well if your team already writes Dart or needs tight UI control. Before you commit, verify that your wallet SDK, RPC client, analytics library, and on-ramp partner all have working flutter packages.
Native Swift and Kotlin give you the most control over secure hardware, performance, and OS-specific prompts. The cost is that you are building two products, so this path usually fits larger teams or apps where mobile security is the main differentiator.
Prepare test wallets and testnet funds
Create at least two dedicated test wallets. Use one as the user account and one as the deployer account, so you can test real approval, transfer, and contract-call paths.
Warning: never test with a wallet that holds real funds or your personal seed phrase. A copied private key in a local config file can turn a test build into a real loss.
Choose a testnet that matches your mainnet plan. Ethereum developers often use sepolia. Ropsten was shut down in November 2022 (ethereum foundation, Nov. 2022), so do not use old tutorials that still point to it.
Check supported SDKs before you commit
Run the 3-layer compatibility check before choosing a vendor. Confirm the SDK works with your target chain, your mobile framework, and your app-store distribution model. A browser-first swap widget may work on mainnet but fail inside a native app review.
Category | Options to evaluate | What to verify |
|---|---|---|
Wallet connection | walletconnect appkit, privy, active, thirdweb | External wallet flow, embedded wallet flow, and recovery support. |
Account abstraction | zerodev, biconomy, alchemy account kit | Bundler, paymaster, session key, and chain coverage. |
RPC infrastructure | alchemy, infura, quicknode | Rate limits, websocket support, failover, and pricing. |
Fiat on-ramp | transak, moonpay, coinbase pay | Country coverage, KYC thresholds, and app policy fit. |
Compliance tooling | chainalysis, trm labs, elliptic | Screening needs if you touch fiat, regulated assets, or high-risk regions. |
SDKs can cut build time, but they also decide how keys, sessions, and signing prompts behave. Read their security pages, check audit reports, and write down what happens to users if the vendor API goes offline.
Step 1: define the use case and user flow
Before you code, answer one question: what is the one action your app must help a user complete? Pick a single verb such as buy, swap, mint, stake, earn, sign in, or send.
Pick one primary job to be done
Common web3 mobile app categories include self-custody wallets, swap interfaces, NFT minting apps, token-gated communities, games, encrypted messaging apps, exchange companion apps, and staking dashboards. Each category has different custody, compliance, SDK, and support requirements.
If your first version tries to do five things, you will multiply your error states. Start with one core action and make it work from install to confirmed transaction.
Andreas Antonopoulos often teaches that good crypto tools reduce the number of decisions a user must make before they can act safely. Apply that idea to your feature list. Remove anything that does not support the first useful action.
Sketch the first five screens
Map the first five screens before opening your IDE:
- Install and splash: show the brand and load local configuration.
- Sign-up: offer email, passkey, social login, or wallet connection based on your audience.
- Wallet creation or connection: create an embedded wallet or connect an existing one.
- Asset or action view: show a real balance, NFT, staking position, or contract action.
- First transaction confirmation: show the action, fee, destination, and risk before signing.
Set a practical target: a new user should reach the first confirmed testnet action in under two minutes during a guided test. If they pause on a phrase like gas, seed, chain, or approval, rewrite the screen.
Step 2: choose the wallet and onboarding model
Your wallet strategy is the biggest product decision in a web3 mobile app. It affects conversion, support load, custody exposure, recovery, and regulatory review.
Model | Best for | Pros | Risks |
|---|---|---|---|
Connect wallet | DeFi power users | Low custody exposure and fast integration. | Beginners may leave because they do not have a wallet yet. |
Embedded wallet | Consumer apps and games | Normal sign-up feel and more control over UX. | You depend on key infrastructure and recovery design. |
MPC or passkey wallet | Fintech-style products and mid-level users | No seed phrase during normal use and better phishing resistance. | Device-change and recovery flows are harder to explain. |
Custodial account | Total beginners and regulated products | Familiar login, password reset, and support flows. | Custody liability, licensing, and compliance work increase. |
Compare external and embedded wallets
A connect-wallet flow asks users to open an existing wallet, approve a connection, and return to your app. This is good for DeFi users who already understand signing, but it filters out mainstream users before they see value.
An embedded wallet creates the wallet during sign-up. Thirdweb reported more than 1 million embedded wallets by Q1 2025 (thirdweb, 2025), which signals why consumer teams like this model. The tradeoff is that recovery and key handling become part of your product responsibility.
Use embedded wallets when your target user has never bought crypto. Use connect wallet when your target user already has funds, understands approvals, and expects self-custody from the first tap.
Use passkeys, MPC, or social login carefully
Passkeys and MPC wallets remove the seed phrase from normal onboarding. A passkey uses a device credential or password manager. MPC splits key material into shares so no single party holds the full secret.
If you want the technical background, read how MPC wallets protect crypto keys before choosing a provider. Then design recovery, device change, account deletion, and export before launch.
Lyn Alden, founder of Lyn Alden Investment Strategy, writes frequently about counterparty risk and self-custody tradeoffs. That lens matters here: a friendly login can still create serious user risk if the recovery path is unclear.
Design the recovery flow first
Start with the bad day scenario. The user loses a phone, replaces a device, disables cloud backup, or clicks a phishing link. Write the exact screen copy for each case before you polish onboarding.
Give users a clear export path, even if it sits behind an advanced menu. Never let account deletion destroy access to funds without repeated warnings and a recovery check.
Pro tip: Hiding a seed phrase can improve first-run conversion, but it does not remove your duty to explain custody. Review custodial vs non-custodial wallet models before you decide who controls keys, who can recover accounts, and who carries legal risk.
Step 3: build core crypto features
After the wallet model works, build the features users open the app for. Most production apps need balances, token and NFT views, send and receive screens, buy or swap flows, transaction history, and contract interaction screens.
Warning: never ask users to sign raw hex or an opaque transaction. If your app cannot explain the action in plain English, block the signature until the transaction can be decoded.
Add balances, tokens, and NFTs
Querying each chain directly from the phone is slow. Use an indexing API for token balances, NFT metadata, logos, decimals, and price data. Cache responses locally, show skeleton loading states, and retry failed calls with a visible error message.
NFT images need extra care. Load them lazily, cache thumbnails, and hide likely spam by default when your data provider includes a spam flag or confidence score.
For token metadata, store symbol, decimals, logo URL, and price source together. This prevents display bugs where a token shows as an unknown asset because one field failed to load.
Enable buy, sell, and swap flows
Fiat on-ramps differ by region, KYC requirement, payment method, and off-ramp support. Transak states support for 160+ countries (transak, accessed Jan. 2026), but you should still test your exact target markets before choosing one provider.
For swaps, use an aggregator when possible instead of a single DEX route. Show slippage, price impact, token approval amount, network fee, and total cost before the user taps the blue Confirm button.
A useful default is 0.5% slippage for liquid pairs and a warning when price impact exceeds 1%. If your app changes those values automatically, show the reason in the confirmation screen.
Provider type | Examples | What to test |
|---|---|---|
On-ramp and off-ramp | moonpay, transak | Country coverage, card approval rate, KYC steps, and app policy fit. |
Exchange account on-ramp | coinbase pay | Availability for users without an existing exchange account. |
DEX aggregator | 0x, li.fi, jupiter | Supported chains, quotes, slippage handling, and failed trade messages. |
Show clear transaction confirmations
Every transaction needs a confirmation screen before signing. Show the recipient address, network, amount, estimated gas fee in USD, total cost, and what happens after approval.
Use the three-line clarity test: the user should understand the transaction from three short lines such as, “You are sending 0.5 ETH to 0xabc… on ethereum. Estimated gas: $1.20. Total: $951.20.” If not, rewrite the screen.
If the call touches a smart contract, decode the function and parameters. Put raw calldata behind an Advanced details link, not on the main screen. Keep the Cancel link visible above the main Confirm button.
Step 4: abstract the blockchain without hiding risk
Now make the app feel easier without pretending transactions are risk-free. Account abstraction, gas sponsorship, batching, and chain abstraction can reduce friction, but users still need to know when they are spending money or granting permissions.
Use gas sponsorship and smart accounts
ERC-4337 reached Ethereum mainnet in March 2023 (EIP-4337, Mar. 2023). It lets apps use programmable smart accounts, paymasters, and bundlers instead of forcing every new user to hold gas before doing anything useful.
A paymaster can sponsor a first transaction, which helps onboarding. Treat sponsored gas as user acquisition cost. Add per-wallet limits, IP and device checks, rate limits, and daily spend alerts before launch.
Session keys can let a user approve a narrow set of actions for a limited time. For example, a game could allow small in-game moves for 30 minutes without a wallet pop-up every tap, while still requiring a fresh signature for withdrawals.
Handle multi-chain UX
Multi-chain support sounds attractive, but each added network increases QA, RPC cost, balance indexing, and support work. For a first version, one well-supported chain is usually better than five fragile ones.
- Lock beginners to one chain: do not show a long network selector on day one.
- Validate chain IDs: check the wallet network before every signature request.
- Use RPC failover: configure at least two providers or a provider with automatic fallback.
- Explain bridge risk: if users move assets across chains, show estimated time, fees, and failure cases. Read how DeFi protocols work across chains before designing this flow.
Explain what users are signing
Raw signing prompts are a security failure. Before any wallet prompt appears, decode the contract call and show the action in plain language.
For example: “You are approving 50 USDC for this staking contract. You can revoke this approval later. This does not move funds yet.” That is safer than showing a method ID and expecting the user to understand it.
Add a two-second delay before the Confirm button becomes active on high-value or irreversible actions. This small pause helps catch accidental taps without making normal use painful.
Step 5: secure the app, contracts, and user funds
Security is not one checklist item. It covers the device, local storage, wallet session, backend, RPC layer, smart contracts, and support process.
Warning: a polished screen can still be dangerous. If signing requests are vague, attackers do not need to break encryption. They can wait for a confused user to approve the wrong action. Review common crypto scam red flags before writing approval screens.
Protect keys and sessions on mobile
Never store private keys in plain async storage, shared preferences, or a local JSON file. On iOS, use the keychain and secure hardware where available. On Android, use hardware-backed key storage when the device supports it.
Require biometric re-authentication before signing. Set session expiry to 15 to 30 minutes of inactivity, then force a fresh open up for transfers, swaps, approvals, exports, and recovery changes.
Tell users the tradeoff clearly. Hardware-bound keys can improve local protection, but funds may be unrecoverable if the user loses the device and has no backup or export path.
Review smart contract permissions
Before real funds touch your contracts, audit every privileged role. Ask who can upgrade contracts, pause withdrawals, change fees, mint tokens, or move treasury funds.
If one externally owned account can do all of that, you have a single point of failure. Follow smart contract access control best practices and use role-based permissions where appropriate.
Admin actions should route through a multisig with a signer threshold, such as 3-of-5, rather than one hot wallet. If your app handles swaps, auctions, or time-sensitive ordering, review front-running prevention for smart contract developers before mainnet.
Plan audits and bug bounties
For a production contract, budget for independent review. A focused audit can cost $15,000 to $60,000 depending on scope (immunefi ecosystem guidance, accessed Jan. 2026), so plan this before you promise a launch date.
If you cannot afford a full audit yet, run static analysis, write property tests for money-moving functions, and invite review before mainnet. Automated tools do not replace humans, but they catch many common mistakes.
After launch, publish a bug bounty scope. Prioritize loss of user funds, broken access control, signing confusion, and account recovery failures over low-impact informational issues.
Step 6: test, publish, and monitor your app
At this stage, your job is to prove the app works outside the simulator. Test on real devices, submit with clear policy documents, and monitor the first release as if something will break.
Run end-to-end testnet transactions
Install a fresh build on a physical phone. Create a new wallet, claim faucet funds, perform the app's core action, and confirm the result on a block explorer such as sepolia etherscan.
Test at least three device classes: a low-end Android phone, a mid-tier iPhone, and a tablet. For contract logic, connect this to a smart contract CI/CD testing workflow so regressions fail before release.
Prepare for app review
Apple and google both review crypto apps carefully. Prepare a privacy policy, support URL, financial-risk disclosure, wallet custody explanation, and a test account for reviewers.
If your app includes fiat on-ramps, restricted regions, or KYC, document those controls before submission. Also check crypto money transmitter license requirements for your jurisdiction before you let users move regulated value.
Monitor errors after launch
RPC outages, failed transactions, and wallet creation drop-off are common early problems. Set alerts for crash spikes, failed sends, gas spikes, rejected signatures, and abnormal wallet activity.
Watch the onboarding funnel closely. If 40% of users stop at recovery setup, the wording or flow needs repair. Keep a support email or chat channel visible during the first release week.
Your pre-launch checklist
- Testnet path complete: install, wallet creation, faucet claim, core action, and block explorer verification all pass.
- Device coverage complete: low-end Android, mid-tier iPhone, and tablet tests are done.
- Smart contract review complete: audit, peer review, or documented test coverage is ready.
- App-review documents ready: privacy policy, support URL, risk disclosure, and reviewer notes are written.
- Regional controls enforced: unsupported jurisdictions are blocked where required.
- KYC and AML checks confirmed: fiat flows match your provider and legal requirements.
- Crash reporting live: alerts are connected before the public build ships.
- RPC failover configured: at least two endpoints or automatic fallback is active.
- Transaction monitoring active: failed sends, gas anomalies, and suspicious activity are tracked.
- Incident plan written: the team knows who pauses contracts, contacts vendors, updates users, and restores service.
Summary and next steps
You now have a practical build plan for a web3 mobile app. Define one use case, choose the right wallet model, build the first crypto action, explain every signature, protect keys, test on real devices, and launch only when monitoring is ready.
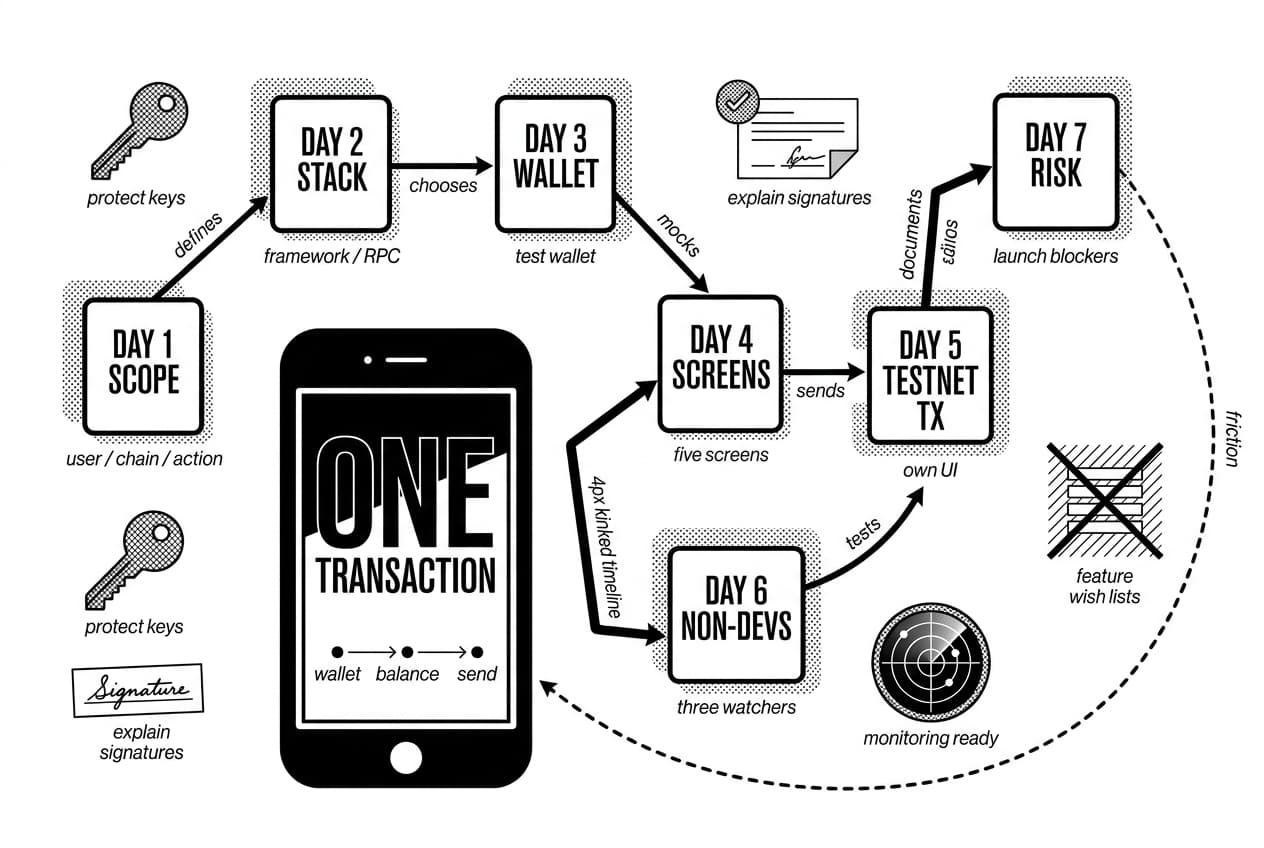
The biggest mistake is adding features before one user can complete one transaction end to end. Nail that path first. Then expand the app based on observed friction, not feature wish lists.
Your 7-day starter plan
- Day 1, define scope: write one paragraph describing the user, the chain, and the first action.
- Day 2, choose your stack: pick the framework, wallet model, RPC provider, and testnet.
- Day 3, connect a wallet: create or connect a test wallet and read a testnet balance.
- Day 4, build mock screens: create the first five screens with placeholder data.
- Day 5, send a testnet transaction: complete one transaction through your own UI.
- Day 6, test with three non-developers: watch where they hesitate and rewrite unclear screens.
- Day 7, document risk: list custody assumptions, vendor dependencies, compliance questions, and launch blockers.
Ship the smallest version that proves the crypto action works safely. Then improve onboarding, recovery, and monitoring before adding another feature.
Frequently Asked Questions
- What are Web3 apps?
- Web3 apps connect to blockchain networks and use features like wallets, tokens, NFTs, smart contracts, or decentralized identity. Users typically own their assets directly and sign transactions themselves rather than relying solely on a central platform account. That said, most Web3 apps still run on standard mobile frameworks and cloud infrastructure behind the scenes.
- What are some good Web3 apps to earn money?
- Popular categories include DeFi staking apps, liquidity pools, play-to-earn games, creator NFT platforms, airdrop programs, and learn-to-earn services. However, earnings are never guaranteed — yields fluctuate, token values drop, and scams are widespread. Always research smart contract audits, fee structures, lockup periods, and token risks before committing any funds.
- How do I start Web3 development as a beginner?
- Begin by creating a test wallet, learning how transactions and gas fees work, and experimenting on testnets before touching real funds. Read basic smart contract concepts, then build a simple app that connects a wallet. Understanding signing, custody, and seed phrase recovery is essential before you move into production environments.
- Which companies use Web3?
- Many industries are exploring Web3, including crypto exchanges, wallet providers, gaming studios, payment companies, luxury brands, social platforms, and financial institutions. Common use cases include payments, loyalty programs, tokenized assets, NFTs, identity, and settlement. Adoption varies significantly by region and is shaped heavily by local regulations and infrastructure maturity.
Sources
Author

Crypto analyst and blockchain educator with over 8 years of experience in the digital asset space. Former fintech consultant at a major Wall Street firm turned full-time crypto journalist. Specializes in DeFi, tokenomics, and blockchain technology. His writing breaks down complex cryptocurrency concepts into actionable insights for both beginners and seasoned investors.