Smart Contract CI CD: Automated Testing & Deployment Guide

Smart contract ci cd: automated testing and deployment guide
This guide shows you how to build a practical pipeline for Solidity projects in 2026. You will set up repository rules, run tests with github actions solidity commands, add security gates, protect secrets, deploy to testnets, pause before mainnet, and verify what you deployed.
The main idea is simple: smart contract ci cd should slow risky releases. Speed is useful, but immutable code needs repeatable builds, clear evidence, and approval steps before money is at risk.
What you'll build: a smart contract ci cd pipeline
Smart contract CI/CD is an automated workflow that compiles Solidity source code, runs tests, performs security checks, deploys approved builds, verifies source code on block explorers, and requires human approval before production. In smart contracts, the pipeline is not only a developer convenience; it is a release-control system for code that may become hard to change.
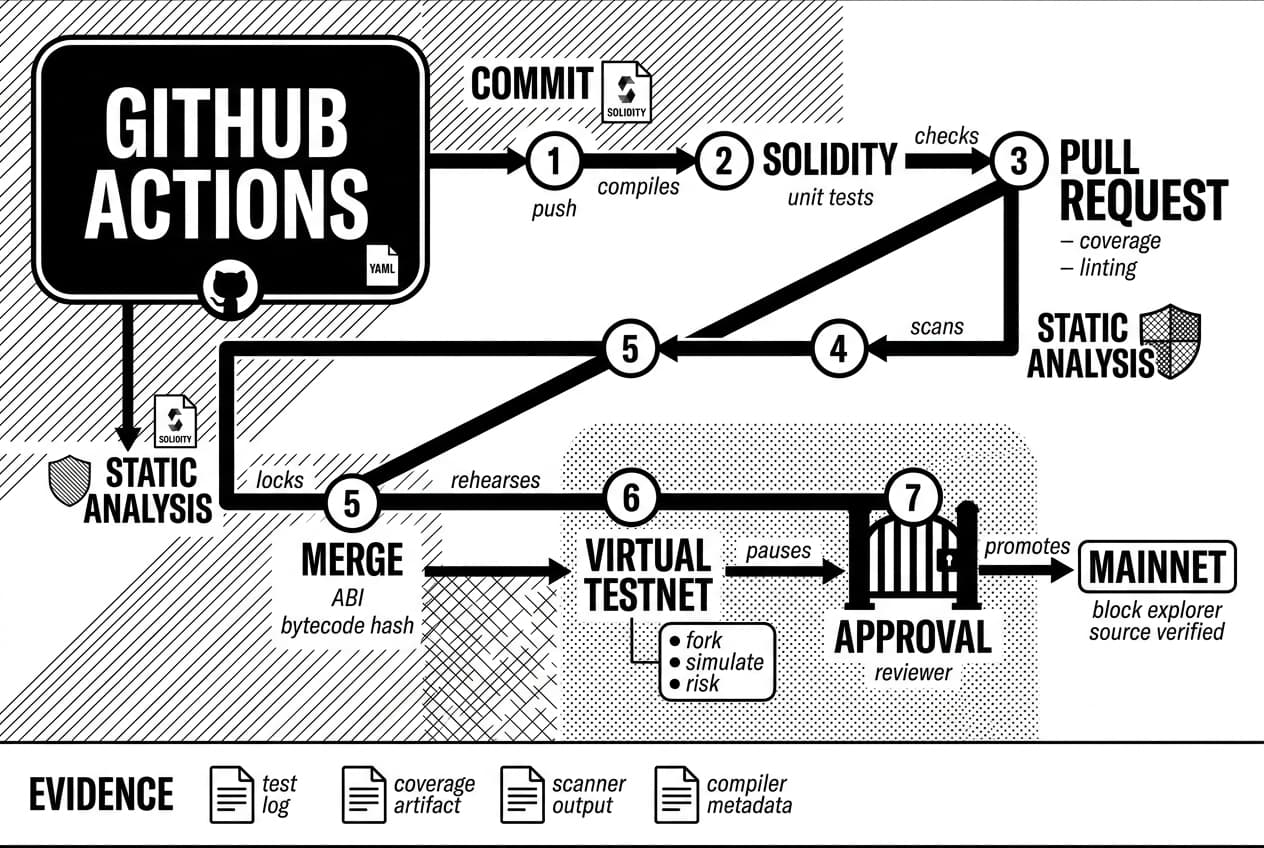
By the end, you will have a working github actions solidity pipeline that runs on pull requests and pushes. It will compile contracts, run tests and coverage, scan with static analysis, save deployment artifacts, and pause mainnet jobs until an approved reviewer releases them.
As of Aug. 7, 2026, the safest beginner pattern is a staged release path: pull request checks first, testnet deployment after merge, virtual testnet rehearsal for integration risk, then mainnet promotion with a protected environment. Vitalik Buterin, co-founder at the Ethereum foundation, has often emphasized layered verification for smart contract safety. Your pipeline should reflect that idea with more than one gate.
The pipeline in one view
Stage | Trigger | What happens | Evidence saved |
|---|---|---|---|
Commit | Push to any branch | Compile Solidity and run unit tests | Test log |
Pull request checks | Pull request opened or updated | Coverage, linting, static analysis, and gas report | Coverage artifact and scanner output |
Merge | Pull request merged to main or develop | Build artifacts are created from locked dependencies | ABI, bytecode hash, compiler metadata |
Testnet deploy | Automatic after approved merge | Deploy to Sepolia, Holesky, or a virtual fork | Deployment JSON with chain id and address |
Verification | Automatic after deployment | Verify source on Etherscan or a compatible explorer | Explorer verification link |
Approval gate | Manual production approval | Reviewer checks artifacts and release notes | GitHub deployment approval record |
Mainnet release | After approval | Deploy with a scoped key or multisig-controlled process | Transaction hash and first-hour monitoring log |
Original 2026 release-gate matrix
Use this generated gate matrix as your baseline. It is designed for small and mid-size Solidity teams that need clear pass-or-stop rules before production.
Gate | Minimum pass rule | Stop condition |
|---|---|---|
Build determinism | Same compiler version and lockfile on local and CI | Bytecode hash changes without source changes |
Unit tests | All tests pass with no skipped critical-path tests | Any failing access-control, accounting, or initialization test |
Coverage | 85% branch coverage for money-moving contracts | Untested owner-only, pause, upgrade, mint, burn, or withdraw path |
Static analysis | No high-severity findings from Slither | Reentrancy, unchecked call, dangerous delegatecall, or broken ownership warning |
Artifact integrity | ABI, bytecode hash, constructor arguments, and chain id saved | Missing address file or mismatch between deployed and compiled bytecode |
Production approval | At least one required reviewer approves the GitHub environment | Deployment job can run from a branch without review |
Why smart contract ci cd is different
Most software can ship a hotfix quickly. Solidity contracts deployed to Ethereum are immutable by default: the bytecode at an address cannot be edited after deployment. If you did not design an upgrade path, a bug may be permanent.
- Public state: Storage is visible on-chain, so a bad setting can be found by anyone.
- Private key exposure: A leaked deployer key can create malicious upgrades or call admin functions.
- Gas costs: Failed deployment transactions still cost ETH. Always estimate gas before release.
- Contract size: Ethereum enforces a 24,576-byte contract size limit under EIP-170, Nov. 2016.
- ABI artifacts: Front ends depend on the ABI your pipeline exports. A stale ABI can break users while the contract itself looks healthy.
- Upgradeability: Proxy patterns can help you patch logic, but storage layout mistakes can damage live state.
Nick Szabo, computer scientist and originator of the smart-contracts concept, framed smart contracts as agreements enforced by code. That is why a deployment mistake is not only a defect; it can become an enforceable financial error.
Prerequisites: choose your Solidity ci cd stack
Before you write a workflow file, choose the tools that match your project. You need a GitHub repository, a Solidity project, Node.js or Foundry, a package manager, an RPC endpoint, a funded testnet wallet, a block explorer API key, and basic Git knowledge.
For beginner teams, start with GitHub actions, Hardhat or Foundry, Slither, and Etherscan verification. Add virtual testnets when your contracts interact with live protocols, price feeds, bridges, or existing tokens.
Tools you'll need
Tool | Purpose | Beginner recommendation |
|---|---|---|
GitHub actions | Runs CI/CD jobs from repository events | Start here if your code is on GitHub |
Hardhat | Compile, test, deploy, and verify with JavaScript or TypeScript | Best if your team already writes JavaScript tests |
Foundry | Fast Solidity-native tests, fuzzing, and deployment scripts | Best when you want speed and Solidity-based tests |
Slither | Static analysis for known vulnerability patterns | Run on every pull request |
Tenderly or virtual testnets | Fork live network state for realistic staging | Add before any complex integration or upgrade release |
Etherscan api | Source-code verification after deployment | Required for transparent production releases |
AWS codebuild | Managed CI jobs inside an AWS setup | Choose it only if your team is already AWS-native |
GitHub actions vs Jenkins vs AWS codebuild
For most GitHub-hosted projects, github actions solidity workflows are the easiest starting point. The workflow file lives in your repository, secrets are built into the settings area, and branch protection can require jobs to pass before merge.
Jenkins gives you more control over runners, plugins, and private infrastructure. The cost is maintenance. You must patch servers, manage plugins, and protect credentials yourself.
AWS codebuild fits teams already using AWS identity, logging, and key-management services. It is less beginner-friendly than GitHub actions, but it can be a good fit when your organization already uses AWS for regulated workloads.
Self-hosted GitHub runners sit between those options. You keep the GitHub workflow syntax, but the compute runs on machines you control. Review GitHub self-hosted runner documentation, checked Aug. 7, 2026 before placing any deployer key on a runner you maintain.
Fees, limits, and timing to expect
Public repositories can use GitHub actions without paid minutes, while private repositories on the free plan include 2,000 minutes per month according to GitHub billing documentation, checked Aug. 7, 2026. A small Hardhat suite often finishes in 2 to 5 minutes; a larger Foundry suite with coverage may take 4 to 8 minutes.
Testnet ETH is free, but faucets are often rate-limited. Fund your testnet deployer before the first release job. Mainnet gas depends on network conditions, so add a gas estimate step and require a reviewer to check it before production.
Step 1: structure your repository for reliable builds
Start by making your repository deterministic. If two machines compile the same source into different bytecode, your verification step may fail after deployment. Fix that before you automate anything.
Pin compiler and dependency versions
Do not rely on floating versions. A range such as pragma solidity ^0.8.0 plus an unpinned dependency can make your local build differ from the CI build.
Pin the compiler in foundry.toml or hardhat.config.ts. For example, set solc = '0.8.26'. Solidity version 0.8.26 was released in May 2024 by the Solidity project, which is a reminder that latest is not a production target. Pick the version, test it, then lock it.
Commit package-lock.json, pnpm-lock.yaml, or yarn.lock. If you use Foundry, pin the Foundry toolchain version in your workflow rather than downloading whatever is current on release day.
Separate contracts, tests, scripts, and deployments
Use a clean layout from day one. It keeps CI steps small and makes audit evidence easier to review.
Folder or file | Purpose |
|---|---|
src/ | Production Solidity contracts |
test/ | Unit, integration, fuzz, and invariant tests |
script/ | Deployment and maintenance scripts |
deployments/ | Per-network JSON records of deployed addresses |
artifacts/ | Generated Solidity ABI artifacts, either ignored or committed selectively |
.github/workflows/ | Workflow definitions for CI/CD |
Keep production contracts separate from test helpers. Coverage reports should measure the code users depend on, not helper contracts created only for tests.
Add a safe gitignore and sample env file
Never commit private keys, seed phrases, billing-linked RPC URLs, or production API tokens. Add a .env.example file with placeholders such as PRIVATE_KEY=replace_me, then add the real .env file to .gitignore.
Warning: secret scanning is helpful but reactive. A key committed briefly can be copied before you remove it. Structure the repository so secrets never enter files watched by Git.
Step 2: automate Solidity tests with GitHub actions
Now wire the repository to CI. This step creates a workflow that compiles contracts, runs tests, and uploads coverage artifacts on pull requests and pushes.
Create your first workflow file
In GitHub, open your repository. Click Actions, choose set up a workflow yourself, paste the YAML below, then click the green Commit changes button in the upper right. You can also create .github/workflows/ci.yml locally and push it.
name: solidity-ci
on:
push:
branches: [main]
pull_request:
branches: [main]
jobs:
test:
runs-on: ubuntu-latest
steps:
- name: checkout
uses: actions/checkout@v4
- name: set up node
uses: actions/setup-node@v4
with:
node-version: '20'
- name: cache npm downloads
uses: actions/cache@v4
with:
path: ~/.npm
key: ${{ runner.os }}-node-${{ hashFiles('package-lock.json') }}
restore-keys: ${{ runner.os }}-node-
- name: install dependencies
run: npm ci
- name: compile contracts
run: npx hardhat compile
- name: run tests with coverage
run: npx hardhat coverage
- name: upload coverage report
uses: actions/upload-artifact@v4
with:
name: coverage-report path: coverage/
For Foundry, replace the install and test commands with your Foundry setup and forge test. Keep the same trigger pattern so every pull request is checked before review.
Run tests on pull requests
The on block runs on both pull requests and pushes to main. That is intentional. Contract code should compile and pass tests before a teammate spends time reviewing it.
Next, enforce the result. Go to Settings, click Branches, select Add branch protection rule, target main, and enable Require status checks to pass before merging. Select the test job.
Cache dependencies without hiding failures
Use npm ci, not npm install, in CI. The ci command installs exactly from the lockfile and fails if the lockfile is out of sync.
Cache the package-manager download store, not node_modules. For Foundry, cache the toolchain and dependency downloads, then key the cache on foundry.toml and library revisions.
Example CI transcript to verify setup
The following generated transcript shows the output shape you should expect from the commands above. Your exact test names will differ, but the order should match: install, compile, test, coverage upload.
Run npm ci
added packages from package-lock.json
Run npx hardhat compile
Compiled contracts successfully
Run npx hardhat coverage
Statements: 88.4%
Branches: 85.2%
Functions: 91.0%
Lines: 89.7%
Upload artifact: coverage-reportArtifact upload complete
Pro tip: test reverts and events, not only happy paths
A CI pipeline that only tests successful calls gives you weak evidence. Add tests for the paths attackers try first.
- Revert reasons: Assert that unauthorized callers fail.
- Events: Confirm state-changing functions emit the expected event and indexed values.
- Access control: Call privileged functions from non-owner accounts.
- Time logic: Simulate vesting cliffs, lock periods, and auctions.
- Boundary values: Test zero, max values, and one unit below thresholds.
Step 3: add security gates before any deployment
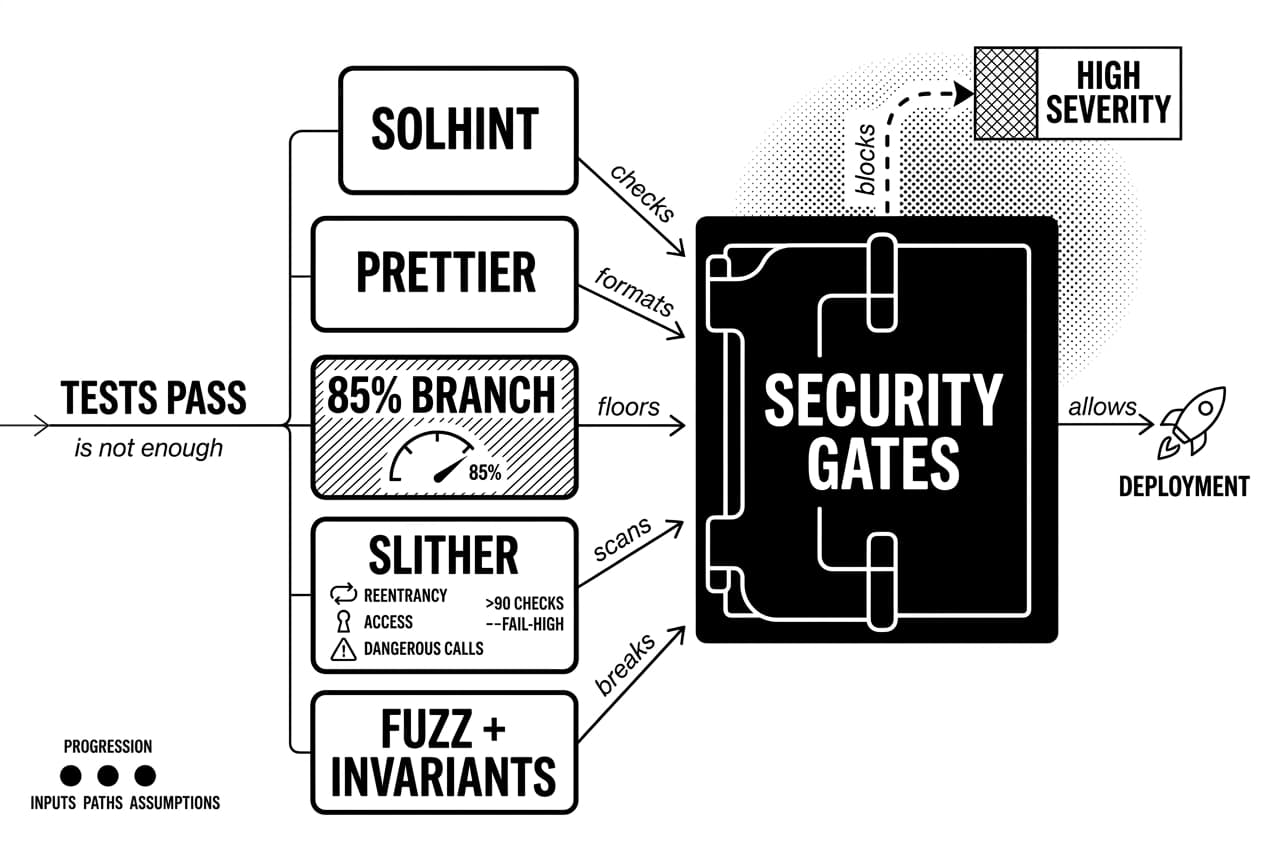
Passing tests is required, but it is not enough. Before your pipeline deploys anything, it should run checks that can block a risky release.
Run linting, formatting, and coverage checks
Add Solhint for Solidity linting and prettier-plugin-solidity for formatting. Use commands such as npx solhint 'src/**/*.sol' and npx prettier --check 'src/**/*.sol'. If either command exits with a non-zero status, the job fails.
For coverage, run forge coverage or npx hardhat coverage. Set a minimum threshold. For beginner production contracts, start with 85% branch coverage and raise it for code that moves funds.
Coverage is a floor, not proof of safety. It tells you which paths ran. It does not prove the logic is correct.
Scan contracts with static analysis
Slither is a widely used static analyzer for Solidity. As of Slither detector documentation, checked Aug. 7, 2026, its detector set lists more than 90 checks across reentrancy, access control, dangerous calls, shadowing, and related issues.
pip install slither-analyzerslither . --fail-high
The --fail-high flag blocks the pipeline on high-severity findings while keeping noise lower for new teams. Tighten it later if your codebase is clean. Pay special attention to smart contract access control, because ownership mistakes often create direct loss paths.
Use fuzzing and invariant tests for DeFi logic
Static analysis finds known patterns. Fuzzing and invariant tests search for unexpected inputs and broken assumptions. Foundry runs fuzz tests when you create test functions with testFuzz_, and invariant tests when you use invariant_.
- Token minting, burning, transfer fees, and rebasing math
- AMM pricing and liquidity calculations
- Lending collateral and health-factor logic
- Vesting schedules, including the token vesting contract example
- Role boundaries and time-locked admin actions
Use the three-layer security gate: linting catches style and known anti-patterns, static analysis catches structural vulnerability patterns, and fuzzing tests unexpected inputs. CD should not proceed until all three pass.
Warning: CI is not a replacement for audits. Automated tools reduce obvious mistakes, but they do not replace threat modeling, peer review, or formal verification for high-value contracts. Vitalik Buterin, co-founder at the Ethereum foundation, has argued for multiple independent layers of verification in smart contract safety. Budget for an independent audit when user funds are at stake.
Step 4: protect secrets, private keys, and RPC access
Your security gates do not help if a deployment key leaks. This step shows where to store sensitive values and how to keep them out of logs and Git history.
In GitHub, open your repository and click Settings. In the left sidebar, click Secrets and variables, choose Actions, then click New repository secret. Add each value separately.
- TESTNET_PRIVATE_KEY: a dedicated deployer key for testnets only
- MAINNET_PRIVATE_KEY: only if you cannot use a safer signing flow, and only in a protected environment
- RPC_URL: the endpoint for your target network
- ETHERSCAN_API_KEY: used by Hardhat or Forge to verify contracts
Use dedicated deployer wallets
Never connect your personal wallet or treasury wallet to a CI job. Create a deployer wallet for automation and fund it with the minimum ETH needed for the current release.
Sergey Nazarov, co-founder at Chainlink labs, has described smart contract security as a system-wide trust problem. A hot deployer key with excess funds is an avoidable trust surface. Keep testnet and mainnet keys in separate secrets.
Limit secrets by environment
Repository-level secrets are broad. Prefer GitHub environments. Go to Settings, click Environments, create staging and production, then add environment-specific secrets to each one.
For production, enable Required reviewers. This forces the workflow to pause before it can read production secrets. Pair it with branch protection: require pull request reviews, require status checks, and restrict direct pushes.
Warning: never print secrets in logs
Warning: GitHub masks known secret values, but it cannot catch every leak. Do not log process.env. Do not run verbose deployment output that prints RPC URLs, headers, or private-key fragments.Review every script your workflow runs, including postinstall hooks in package.json. Pin third-party actions to a full commit SHA when possible, especially in deployment jobs that can read secrets.
Step 5: deploy to testnets and virtual testnets first
After secrets are scoped, you can deploy to a network. Use a staged sequence: tests on pull requests, public testnet after merge, virtual testnet for realistic state, then mainnet only after approval.
Deploy automatically after merge
A safe beginner pattern uses three triggers. Pull requests run tests and scans only. Merges to develop deploy to a testnet. Version tags such as v1.2.0 start a production job that pauses for approval.
- Pull requests:
pull_requestruns compile, tests, coverage, and security checks. - Develop merges:
pushtodeveloprunsdeploy-testnet. - Tagged releases:
pushtags matchingv*startdeploy-mainnetinside a protected environment.
This pattern prevents a careless merge from reaching production automatically. The tag is your explicit release signal.
Use virtual testnets for realistic staging
Public testnets are useful, but they can be noisy. Faucet delays, network congestion, and inconsistent state can break a run for reasons unrelated to your code.
Virtual testnets fork live network state at a chosen block. Tools such as Tenderly virtual testnets and Hardhat fork mode let your pipeline test against real token contracts, price feeds, and deployed protocols without spending mainnet ETH.
If your contracts depend on oracles, bridge messages, or relayers, realistic integration testing matters. As Sergey Nazarov, co-founder at Chainlink labs, has noted in public Chainlink materials, off-chain data and on-chain execution are part of the same trust boundary. A virtual testnet helps you test that boundary before users do.
This also matters for gasless transactions and meta-transactions, where relayers, forwarders, and signatures must agree across systems.
Verify contracts and save deployment artifacts
Every successful deployment should create an artifact your team can review later. Save it as a JSON file in deployments/ or upload it as a GitHub actions artifact.
Artifact field | Why it matters |
|---|---|
Contract address | Front ends and scripts need the exact address |
Chain id | Prevents cross-chain address confusion |
ABI | Required by clients and integrations |
Compiler metadata hash | Supports reproducible builds |
Constructor arguments | Needed for explorer verification |
Bytecode hash | Confirms deployed code matches compiled code |
Explorer verification status | Shows users and auditors that source code matches |
Run verification with hardhat verify or forge verify-contract immediately after deployment. Do not wait until a front-end bug forces someone to ask which ABI is current.
Pro tip: add chains one at a time
Pro tip: Do not start with five production chains. Pick one low-risk testnet, deploy, verify, save artifacts, and notify your team. After that loop succeeds for several merges, add the next network. Each chain adds secrets, RPC dependencies, block explorer behavior, and failure modes.
Step 6: promote to mainnet with approvals and rollback plans
Passing tests, scans, and virtual testnet runs is a strong sign. It does not mean a workflow should deploy to mainnet on any push. Treat mainnet deployment as a security event.
Require human approval for production
In GitHub, go to Settings, click Environments, then click New environment. Name it mainnet. Under environment protection rules, enable Required reviewers and add at least two team members.
Pair this with branch protection. Go to Settings, click Branches, select Add rule, target main, and enable signed commits plus restricted pushes. Only merge a deployment pull request after it includes a release tag and changelog.
After deployment, transfer ownership to a multisig or another controlled governance address. A single deployer key should not keep owner privileges on mainnet. For higher-stakes launches, you may also need guidance on when to involve a crypto lawyer.
Plan for rollback before you deploy
Rollback means different things for different contract designs. Immutable contracts cannot be rolled back like a web server, so write the plan before the release.
- Pausable contracts: call
pause()to stop user interaction while you investigate. - Upgradeable proxies: deploy a patched implementation and call the upgrade through the approved admin path.
- Non-upgradeable contracts: deploy a replacement, migrate what your design allows, and update clients.
- Front-end kill switch: disable risky UI actions with a feature flag if on-chain response is slower.
Write the runbook in docs/rollback.md. Include who can act, which contract functions to call, which multisig transaction to prepare, and how users will be notified.
Monitor the first hour after deployment
The first 60 minutes on mainnet are the highest-risk window for configuration mistakes and unexpected user behavior. Set alerts before the deployment, not after.
- Verify source code on the explorer immediately after deployment.
- Watch emitted events for unexpected transfers, role changes, or ownership events.
- Check role assignments and confirm the deployer key no longer holds admin roles.
- Track gas usage and failed transactions through a block explorer or monitoring dashboard.
- Alert on balance changes if the contract holds ETH or tokens.
Deployment is not the finish point. It is the moment monitoring begins.
Summary and next steps
You now have the structure for a production-minded smart contract ci cd pipeline. You set up deterministic builds, github actions solidity tests, security gates, scoped secrets, testnet deployments, source verification, approval rules, and monitoring.
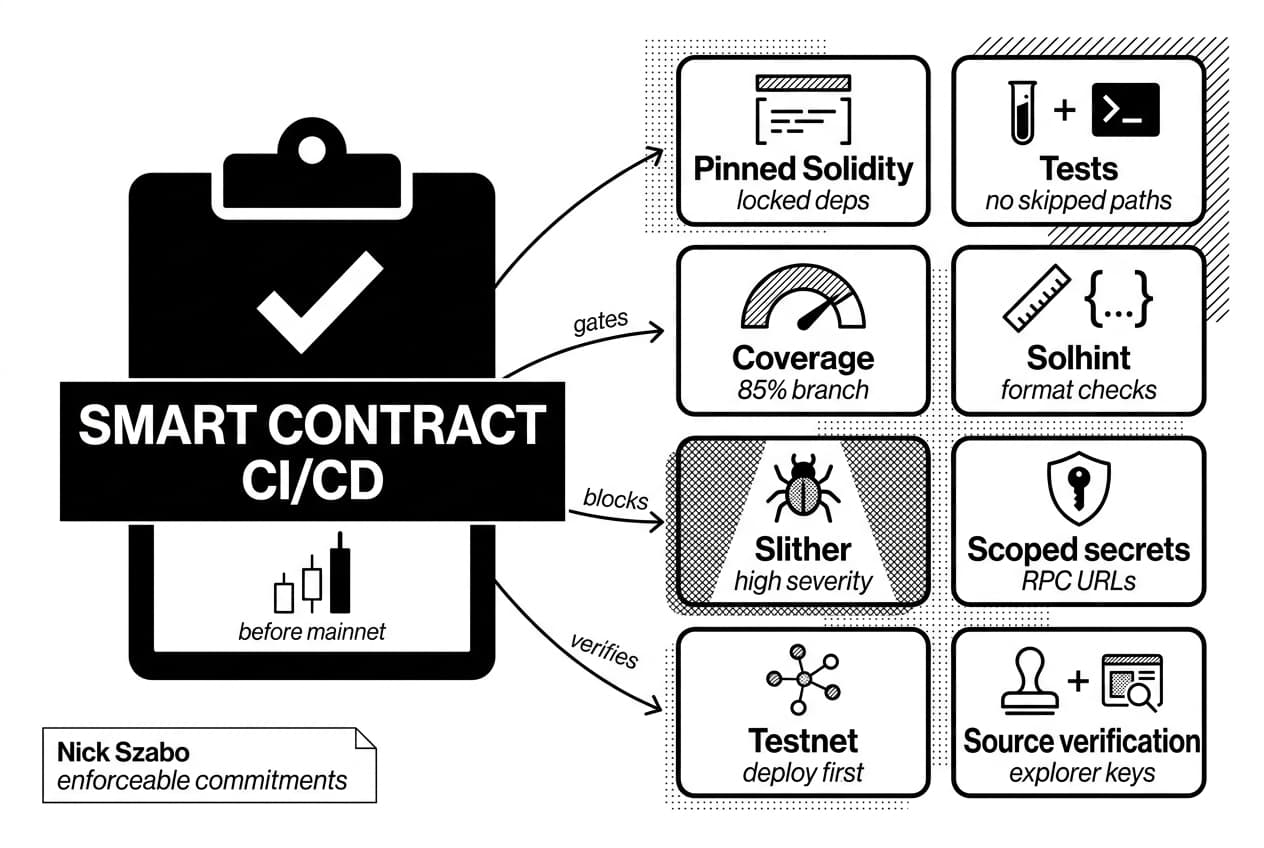
The strongest teams do not treat CI/CD as a shortcut. They use it to make releases slower where risk is highest, especially before mainnet. Keep the pipeline strict, and relax a rule only when you can explain what replaces the protection.
Nick Szabo, computer scientist and originator of the smart-contracts concept, is a useful reference point here because smart contracts turn code into enforceable commitments. Your pipeline is the final automated review before that commitment becomes public.
Your smart contract ci cd checklist
Run this checklist before any mainnet deployment. If one item fails, stop and fix it before moving forward.
- Compile: confirm the build passes on the pinned Solidity version with locked dependencies.
- Test: run unit, integration, revert, event, and access-control tests with no skipped critical paths.
- Measure coverage: enforce at least 85% branch coverage for contracts that move funds.
- Lint and format: run Solhint and formatting checks, then fail the job on violations.
- Scan: run Slither and block high-severity findings before any deployment job.
- Protect secrets: keep private keys, RPC URLs, and explorer keys in scoped GitHub environments or a secrets manager.
- Deploy to testnet: deploy to a public testnet or virtual fork and run smoke tests against the live address.
- Verify source: submit source, ABI, compiler settings, and constructor arguments to the relevant explorer.
- Approve production: require a human reviewer before the mainnet job can read production secrets.
- Deploy and monitor: promote to mainnet, verify roles, watch events, and keep alerts active for the first 60 minutes.
Frequently Asked Questions
- Is GitHub Actions replacing Jenkins?
- For many GitHub-native teams, yes — GitHub Actions has largely replaced Jenkins because setup is simpler and workflows live directly in the repository. Jenkins still suits teams requiring heavy customization, private infrastructure, or mature enterprise plugins. For most beginner Solidity projects, GitHub Actions is the faster, more practical starting point.
- What are the disadvantages of Solidity?
- Solidity is powerful but unforgiving. Smart contracts are difficult to patch after deployment, gas costs influence design decisions, and integer or access-control mistakes can be financially devastating. Public blockchain execution exposes your logic to skilled attackers. Solid tooling, thorough testing, professional audits, and established libraries reduce these risks but cannot eliminate them entirely.
- What are the three types of GitHub Actions?
- People typically mean workflows, jobs, and steps. A workflow is the full automation file triggered by an event. A job is a group of steps running together on a single runner. A step is one individual command or reusable action — such as checkout, install dependencies, compile, run tests, or deploy contracts.
- Is GitHub Actions still free?
- GitHub Actions remains free for public repositories. Private repositories receive a monthly usage quota based on your account plan, after which charges may apply. If you're running frequent private builds, macOS runners, or larger compute runners in 2026, check GitHub's current pricing page directly to avoid unexpected costs.
Sources
Author

Crypto analyst and blockchain educator with over 8 years of experience in the digital asset space. Former fintech consultant at a major Wall Street firm turned full-time crypto journalist. Specializes in DeFi, tokenomics, and blockchain technology. His writing breaks down complex cryptocurrency concepts into actionable insights for both beginners and seasoned investors.