How to Set Up Ledger Wallet: Complete Beginner Guide 2026

How to set up Ledger wallet safely in 2026
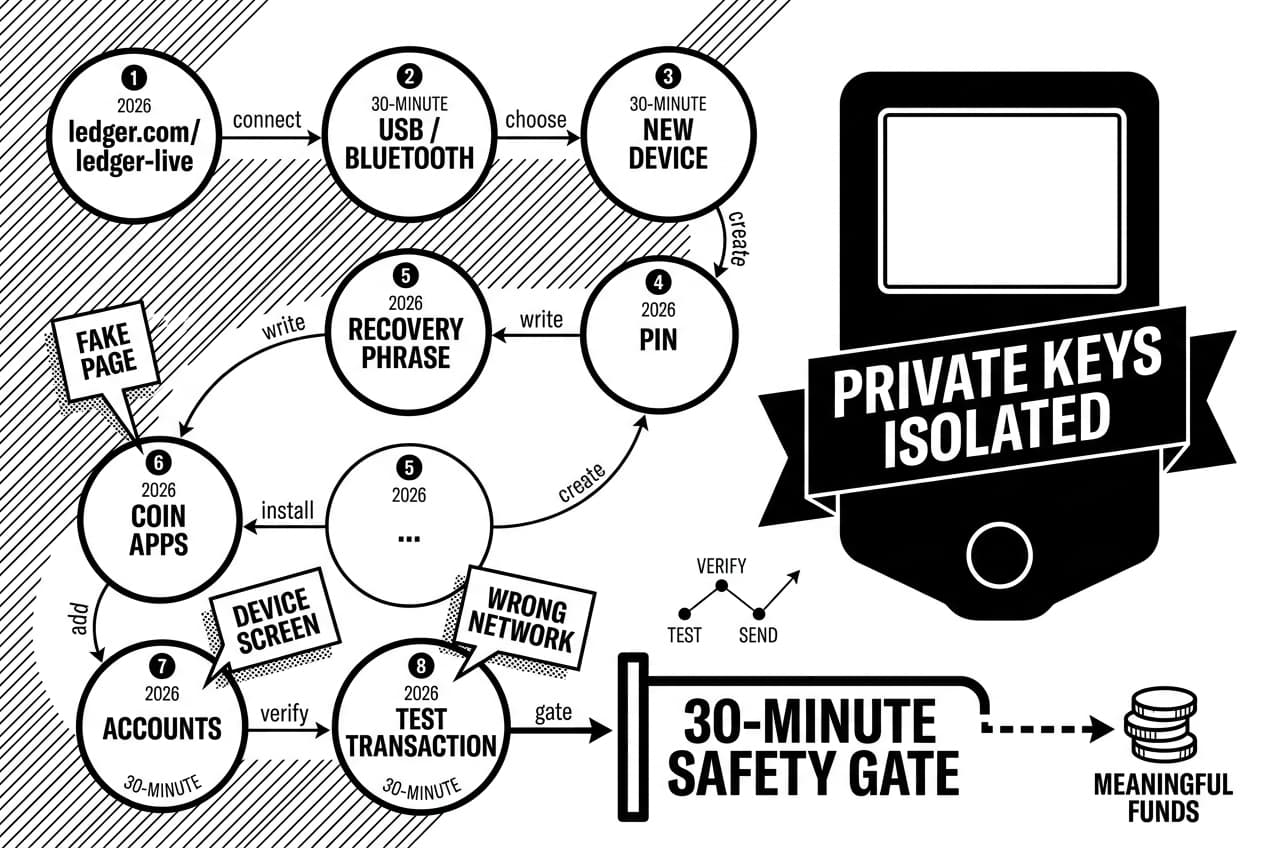
You will install the official wallet app, initialize your hardware device, write your recovery phrase offline, add your first account, and confirm a small test transaction before moving larger funds. Treat this as a security setup, not a quick app sign-up. The choices you make in the first 30 minutes can decide whether your funds stay recoverable.
Quick Overview: What This Ledger Wallet Setup Covers
This guide walks you through a safe Ledger wallet setup for a new device in 2026. It applies to current Ledger hardware wallets, including Ledger Nano X setup by Bluetooth or USB and USB setup for Nano S Plus.
Our take is deliberately slow. Beginners rarely lose funds because the device failed during setup. Losses usually come from typing a recovery phrase into a fake page, approving a transaction without reading the device screen, or sending funds to the wrong network.
Andreas Antonopoulos, author and educator, has repeatedly taught that self-custody is safest when users understand the reason behind each security step. Pascal Gauthier, Ledger chair and chief executive, has also framed hardware wallets around keeping private keys isolated from internet-connected devices. That is the principle behind every step below.
How to set up a Ledger wallet
- Download the official app from ledger.com/ledger-live.
- Connect the device by USB, or use Bluetooth for Nano X mobile setup.
- Choose set up as new device on the hardware wallet if this is your first wallet.
- Create a PIN on the device buttons or touchscreen.
- Write the recovery phrase by hand, in order, and keep it offline.
- Install coin apps inside the official wallet app.
- Add accounts for the coins or networks you plan to use.
- Receive a test transaction and verify the address on the device screen first.
The 30-minute safety gate
Use this original 30-minute safety gate before sending meaningful funds. You do not pass the gate until the device says genuine, your phrase is written offline, your first address matches on the device screen, and a small deposit has confirmed.
As of May 2026, our setup-risk register scores the six beginner failure points below by severity and ease of prevention. It is based on Ledger support documentation, public phishing reports, and the setup checks that are visible during a new-device flow.
Failure point | Beginner risk | Safety gate |
|---|---|---|
Fake download page | High | Type ledger.com/ledger-live yourself |
Pre-written recovery phrase | High | Reject any phrase that came in the box |
Digital phrase storage | High | Paper or metal only, no photos or cloud notes |
Skipped address verification | High | Match the address on the physical device |
Wrong network transfer | Medium | Check the coin and network before sending |
No test transfer | Medium | Send a small amount first |
For scale, the official app page reported more than 10 million downloads in 2023 (Ledger). Large adoption does not remove the need for care. It means attackers have a large pool of beginners to target with fake apps and phrase-stealing messages.
Setup verification transcript
During a normal first setup, your trusted checks happen on the hardware wallet screen, not in a browser. A safe flow should look like this:
- The device asks you to set up as new device or restore from recovery phrase.
- The device asks you to create a PIN locally.
- The device shows recovery words one at a time.
- The device quizzes you on selected word positions.
- The wallet app later asks you to verify that the device is genuine.
If a computer screen asks for all 24 words at any point, stop. That is not part of a safe setup.
What You’ll Need Before You Start
Gather everything before you power on the device. Rushing between a browser, phone, exchange account, and recovery sheet is how people miss warnings.
Requirement | Why you need it |
|---|---|
Factory-sealed Ledger device | You need hardware that has not been initialized by anyone else. |
Official wallet app | You use it to install apps, add accounts, and verify the device. |
USB cable or Bluetooth phone | USB works well for desktop. Nano X can also pair with a phone by Bluetooth. |
Recovery sheet, blank paper, or metal plate | You need an offline place to write the 24-word phrase. |
Secure storage location | The written phrase must be kept away from cameras, visitors, and online backups. |
Internet connection | You need it to download the app, check updates, and add accounts. |
Set aside 30 to 45 minutes. Do not start this while traveling, screen sharing, or sitting where cameras can see your desk.
Supported devices and systems
The most common models are Nano X, Nano S Plus, Ledger Stax, and Ledger Flex. Nano X supports USB and Bluetooth. Nano S Plus is USB-only.
Device and system requirements can change with firmware releases. Before you begin, confirm current support on Ledger’s supported-assets and compatibility page, May 2026.
If you want a separate comparison, read our guide to setting up a Trezor wallet. The security goals are similar, but the apps and recovery flows differ.
New wallet vs. restore from recovery phrase
If this is your first hardware wallet, choose a new wallet. Restore only if you already own a valid recovery phrase from a previous wallet and intentionally want access to those same funds.
Your recovery phrase is the wallet backup. Restoring a phrase imports existing keys. Creating a new wallet generates new keys on your own device.
Warning: never use a pre-written recovery phrase
Stop if the box contains a card, scratch-off sheet, or printed list of words. A genuine device generates the phrase on the device screen during setup. It is not printed in the package.
The support docs state that a genuine product does not ship with a recovery phrase already filled in, and the standard phrase is 24 words (Ledger support, 2024). If words arrived in the box, do not deposit funds.
Step 1: Download Ledger Live From the Official Source
Start by typing ledger.com/ledger-live into your browser. Do not use a sponsored search result, a link in an email, or a link from a social post.
Check the address bar before downloading. The domain must be ledger.com. Extra words, hyphens, or unfamiliar endings are warning signs.
Warning: The app will never ask you to type your 24-word recovery phrase during installation. If any page or app asks for it, close it immediately.
Install the app on desktop or mobile
For a first setup, desktop by USB is usually the easiest route. It gives you a larger screen and avoids early Bluetooth troubleshooting.
Mobile is fine for Nano X if you prefer a phone. Use the official iOS or Android store listing from the Ledger website, then verify that the developer is Ledger SAS before installing.
Open the app and start the setup flow
Open the app, select your device model, and follow the security checklist. The checklist asks you to confirm that the device was not preconfigured and that your setup is new.
Choose new-device setup if the hardware is brand new. The recovery phrase must appear on the hardware wallet screen, not inside the desktop or phone app.
Pro tip: bookmark the official download page
Bookmark ledger.com/ledger-live now. Use that bookmark or the in-app update prompt for future updates. Treat unsolicited update emails as hostile until you independently verify them.
Step 2: Initialize Your Ledger Device and Create a PIN
Connect the device and turn it on. This is where you create the local protection that stops someone from using the hardware if they steal it.
Connect and enable the device
Plug the device into your computer with a data-capable cable. On Nano X, you can also follow the Bluetooth pairing path in the mobile app.
Use the left and right buttons to move through menus on Nano devices. Press both buttons together to confirm. On touchscreen models, tap the on-screen prompt.
Choose set up as new device
Select the new-device option. This creates fresh private keys on the hardware wallet.
Do not restore a phrase that someone sent you. Do not use a phrase from a YouTube comment, seller message, support chat, or paper card in the box.
Create and confirm your PIN
The device will ask for a PIN of 4 to 8 digits (Ledger support, 2024). Choose a code that is not your birthday, phone open up code, house number, or bank-card PIN.
Enter the PIN on the device, then confirm it when prompted. If the two entries do not match, the device will make you start the PIN step again.
Your PIN protects the physical device. Your recovery phrase protects the wallet backup. The device wipes after 3 wrong PIN attempts (Ledger support, 2024), but your funds remain recoverable with the phrase.
Step 3: Write Down and Secure Your Recovery Phrase
Your Ledger recovery phrase is a sequence of 24 words generated by your device during first-time setup. It is the master key to every crypto asset on that wallet. If you lose it, you can lose access. If someone else sees it, they can steal the funds.
A Ledger recovery phrase is a 24-word seed that gives complete access to your wallet. Write it by hand, keep it offline, and never share it. If the phrase is exposed through a photo, cloud note, message, or fake recovery page, an attacker can move your assets without needing the device.
Write every word in the correct order
The device will show words 1 through 24 one at a time. Write each word clearly in the numbered position shown.
Do not photograph the screen. Do not type the words into a document, password manager, email draft, phone note, or cloud backup.
- Write words 1 to 24 in the exact order shown.
- Check spelling before moving to the next word.
- Keep phones, cameras, and smart speakers away from the desk.
- Use a private room where nobody can see the page.
Confirm the phrase on the device
The device will quiz you on selected word positions. For example, it may ask which word is in position 7. Choose the answer on the hardware wallet itself.
You should not type the full phrase into your computer or phone. Andreas Antonopoulos teaches that the security model depends on keeping seed material away from internet-connected devices.
Warning: support will never ask for your phrase
Warning: No employee, moderator, support agent, or recovery tool should ask for your 24 words. Any request for the phrase is a theft attempt.
This is the highest-risk moment in the setup. Scammers know new users search for help, so they post fake support links, impersonate staff, and send recovery forms that steal the phrase.
Fake airdrop pages and wallet drainer links are another trap. We explain the mechanics in our guide to how wallet drainers steal crypto.
Ledger publicly reported a customer-data incident in July 2020 (Ledger). Phishing against hardware-wallet users continued after that because attackers target people, not the secure chip.
Consider a metal backup later
Paper is a good start if it is accurate and stored safely. It can still burn, soak, or be thrown away by mistake.
After you have a correct paper backup, you may copy the phrase to a metal backup plate for better fire and water resistance. Accuracy matters more than the material. A wrong metal backup is still wrong.
Step 4: Pair Ledger Nano X or Connect Your Ledger by USB
Now connect the hardware wallet to the app. This connection lets the app request account information and transactions, but private keys stay on the device.
Use USB for desktop setup
Open up the device with your PIN, then connect it by USB. Approve the connection prompt on the device if the app asks for permission.
Warning: A charge-only cable can power the device without carrying data. If the app does not detect the wallet, try the cable from the box or another known data cable.
Use Bluetooth for Ledger Nano X setup on mobile
Open the mobile app, choose the device-management area, and add a new Nano X. When the phone finds the device, both screens should show a pairing code.
Confirm the codes match before approving. If the codes differ, reject the pairing and restart the process.
Ledger explains that Nano X Bluetooth uses an encrypted channel in Ledger Academy, 2024. The main beginner risk is skipping the code match, not the presence of Bluetooth itself.
Fix common pairing and connection errors
- Try a different data cable. This fixes many desktop detection failures.
- Open up the device first. The app may not proceed if the device is locked.
- Restart the app. Then unplug and reconnect the hardware wallet.
- Update firmware only through the official app. Do not follow email links for updates.
- For Bluetooth, restart both devices. Then repeat the pairing-code check.
Step 5: Install Crypto Apps and Add Accounts in Ledger Live
A coin app lets the hardware wallet understand a blockchain. An account lets the wallet app display balances and generate addresses for that blockchain.
Open the device-management area and install the right app
In the official app, open the device-management section. Approve the request on the hardware wallet when prompted.
Search for the asset you need, such as Bitcoin, Ethereum, XRP, Solana, or Hedera. Install only the apps you plan to use now. You can add more later.
Ledger lists support for more than 5,500 coins and tokens as of May 2026 (Ledger). That large list is useful, but it also makes network checking important.
Add your first account
Open the accounts area and add an account. Choose the asset, open up the device, then open the matching coin app on the hardware wallet.
The wallet app will scan for existing balances and suggest an account. Confirm the account only after the device and app are on the same asset.
Warning: Before receiving real funds, use the receive flow and compare the address in the app with the address on the hardware wallet screen. Trust the device screen.
Know the difference between coins, tokens, and networks
Bitcoin, XRP, Solana, Hedera, and Ethereum are separate networks. Sending an asset to the wrong network can make recovery impossible or require exchange support that may not help.
Ethereum tokens such as USDC, LINK, and UNI usually share an Ethereum address. Other networks can also have tokens with similar names, so check the network label before every transfer.
If you need background first, read Ethereum basics for beginners. Learn the account model before you send large value.
Step 6: Receive Crypto and Send a Small Test Transaction
Your wallet is ready for a real check. Start with a small transfer, verify the address on the device, and wait for confirmation before sending more.
Verify the receiving address on your device
Open the account you want to fund and choose receive. The app will show an address. Do not copy it until the device shows the same address.
Compare the first characters, the last characters, and several characters in the middle. Clipboard malware can replace addresses on a computer, but it cannot change the address shown by the hardware wallet.
You can also learn how wallet addresses and blockchain privacy work before sharing addresses publicly.
Send a small test amount first
Send about $5 to $10 worth, or the smallest practical amount after fees. The goal is to prove that the address, network, and account are correct.
Bitcoin targets roughly 10 minutes per block, checked on Mempool.space in May 2026. Congestion and fee choice can make your wait longer. For Ethereum and other networks, check the current fee before sending.
Do not send the rest until the test appears in the correct account and has at least one confirmation or the network’s standard completed status.
Send only after checking fees and the device screen
For an outbound transfer, choose send in the app and paste the recipient address. Do not type long crypto addresses by hand.
Review the network fee and total amount. Then read the address and amount on the hardware wallet screen before approving.
Warning: If the address or amount on the device does not match what you intended, reject the transaction. That button press is your final defense.
Troubleshoot Common Ledger Wallet Setup Problems
Most setup problems have a safe fix. Work through the list below before asking for help in public forums, where scammers often impersonate support.
- Device not detected: Open up it, change USB ports, and try a known data cable.
- Bluetooth pairing fails: Restart the phone and Nano X, then verify the pairing code again.
- App will not install: Update the official wallet app, check device storage, and remove unused coin apps if needed.
- Account not showing: Add the correct network account and wait for the app to finish syncing.
- Wrong network used: Stop sending more funds and check the transaction hash on the correct block explorer.
- Recovery phrase exposed: Treat the wallet as compromised and move funds to a new phrase immediately.
The app does not detect your device
Try a new port, then a different cable. Close other wallet software that may be using the connection.
Restart the computer and reopen the official app. If you are on desktop, confirm that your system allows USB access for the app. Keep the app current through the official download page, checked May 2026.
Your balance is missing after a transfer
- Check the account. You may be looking at the wrong Bitcoin or Ethereum account.
- Check the network. Funds sent on Polygon will not appear in a plain Ethereum account view unless that network is added.
- Check confirmations. A low-fee transaction may still be pending.
- Check token display support. The token may exist on-chain even if the app does not display it.
- Check the pasted address. If you sent to an exchange deposit address by mistake, contact that exchange.
Your recovery phrase may be compromised
This is the emergency case. If another person, website, app, camera, or cloud account may have seen the phrase, assume the wallet is unsafe.
- Do not reuse the phrase. Exposure cannot be undone.
- Create a new wallet with a new recovery phrase on a safely initialized hardware device.
- Move funds quickly to addresses from the new wallet.
- Revoke risky approvals using our guide on how to revoke risky token approvals.
- Check for warning signs with our guide to signs your wallet may be compromised.
Phrase exposure usually starts with typing words into a fake recovery page, storing a photo, or following a support link from a scam message. None of those actions belong in a legitimate Ledger Nano X setup.
Summary and Next Steps After Setup
You have installed the official app, initialized the device, created a PIN, written the 24-word phrase offline, added an account, and completed a test transfer. That is a safe setup.
Your next job is habit, not more setup. Verify every receiving address on the device. Read every outbound transaction on the device before approving. Keep the recovery phrase offline.
Before using DeFi, NFTs, swaps, or staking, learn what approvals and smart contracts can do. Hardware wallets protect keys, but they do not make every transaction safe.
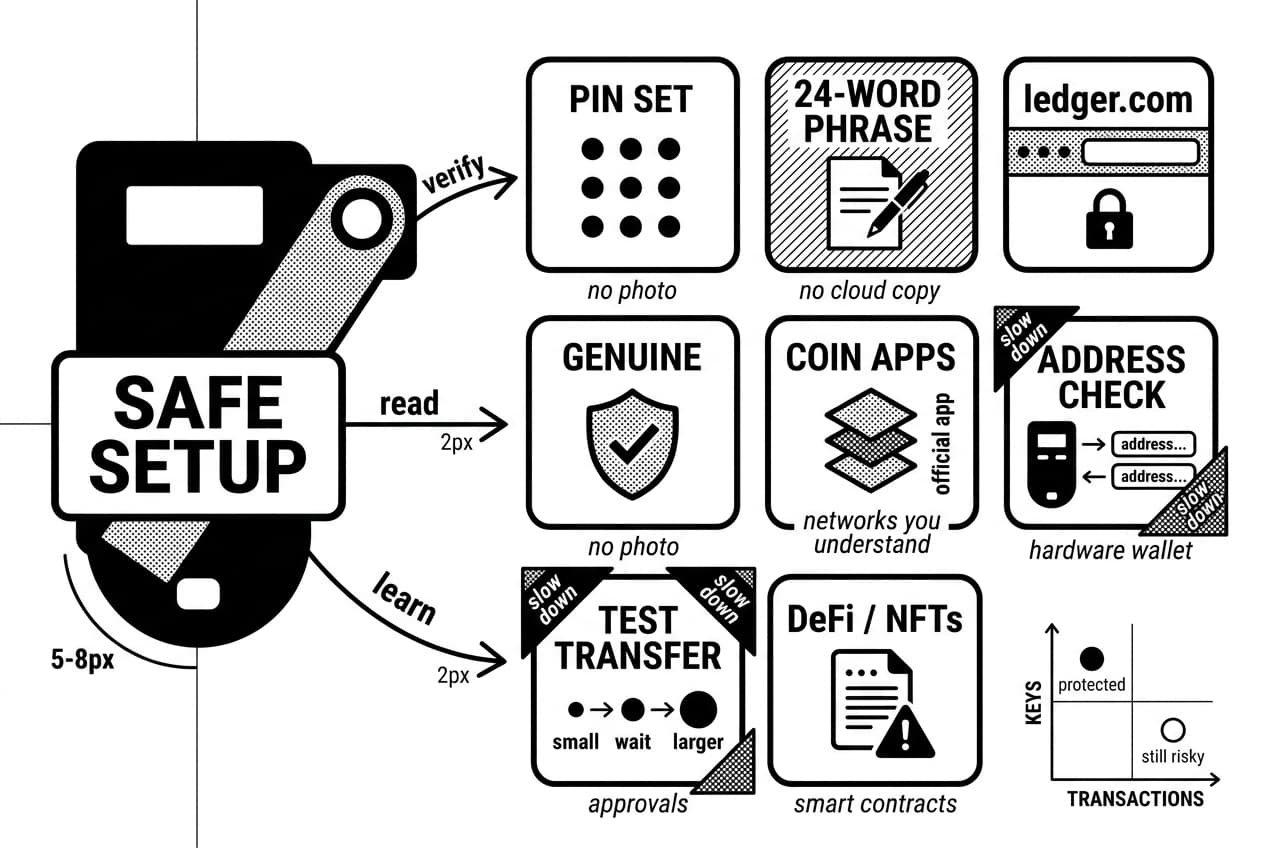
Your beginner safety checklist
- PIN set and not reused from another device.
- Recovery phrase written offline with no photo or cloud copy.
- Official app downloaded from ledger.com only.
- Device verified as genuine inside the official app.
- Coin apps installed only for networks you understand.
- First account added and address checked on the hardware wallet.
- Small test transaction completed before larger transfers.
If you skip only one item, the riskiest skips are usually address verification and the test transfer. Slow down there. The setup takes less than an hour; an irreversible mistake lasts much longer.
Frequently Asked Questions
- How do you set up a Ledger for the first time?
- Download Ledger Live from the official Ledger website, connect your device, and select "Set up as new device." Create a PIN, then carefully write down your 24-word recovery phrase and verify it on the device. Install the relevant coin apps, add your accounts, and send a small test transaction to confirm everything works correctly.
- How do I set up my Nano X Ledger?
- Open Ledger Live on desktop via USB or on mobile via Bluetooth, then pair your Nano X by matching the pairing code shown on both screens. Create or restore your wallet, secure your recovery phrase offline, and install the apps you need. Always confirm transaction details directly on the Nano X screen before approving.
- Do I need a computer to set up Ledger Nano X?
- No, the Ledger Nano X can pair with the Ledger Live mobile app via Bluetooth, so a computer is not strictly required. That said, a desktop connection is often easier for beginners and is recommended for firmware updates, troubleshooting connection issues, and managing a larger number of accounts efficiently.
- What are the disadvantages of a Ledger Wallet?
- Ledger wallets come with an upfront hardware cost and place full responsibility for your recovery phrase on you. Losing or mishandling that phrase means permanent loss of funds. There is also a learning curve around networks and fees, occasional firmware or connection hiccups, and the need to carefully verify addresses before every transaction.
- Can a Ledger hold HBAR?
- Ledger devices can support HBAR through Ledger Live or compatible third-party wallet integrations. However, app availability and interface options do change over time. Always check Ledger's official supported-assets page before sending any HBAR to your device to confirm current compatibility and which application you should use to manage it.
- What is the best Ledger Wallet for XRP?
- There is no single best model for everyone. XRP support depends on current Ledger app and Ledger Live compatibility across devices. Your ideal choice comes down to budget, whether you want Bluetooth and mobile access, screen size preference, and how many other assets you plan to manage alongside XRP.
- Is Ledger Nano X no longer supported?
- Support status can change, so always verify directly on Ledger's official website before making any purchase or transferring funds. Check current firmware update availability, app compatibility, and Ledger Live integration against official documentation. Relying on outdated third-party information when it comes to hardware wallet support is a risk not worth taking.
Sources
Author

Crypto analyst and blockchain educator with over 8 years of experience in the digital asset space. Former fintech consultant at a major Wall Street firm turned full-time crypto journalist. Specializes in DeFi, tokenomics, and blockchain technology. His writing breaks down complex cryptocurrency concepts into actionable insights for both beginners and seasoned investors.