How to Accept Ethereum Payments: Step-by-Step 2026 Guide

How to accept Ethereum payments: step-by-step 2026 guide
As of March 2026, accepting ETH is no longer just a wallet-address task. You will choose a payment model, secure a receiving wallet, connect checkout, test the full flow, and write policies for refunds, taxes, settlement, and network choice before the first customer pays.
This guide shows you how to accept Ethereum payments as a merchant without turning your checkout into an accounting problem. The practical goal is simple: let customers pay in ETH while you keep clean records, limit volatility, and avoid preventable support tickets.
how Ethereum payments work for merchants in 2026
To accept Ethereum payments, a merchant needs a wallet or processor, an invoice or checkout screen, a customer transaction, enough confirmations before fulfillment, and a recordkeeping process that saves the transaction hash, ETH amount, fiat value, network, and order ID.
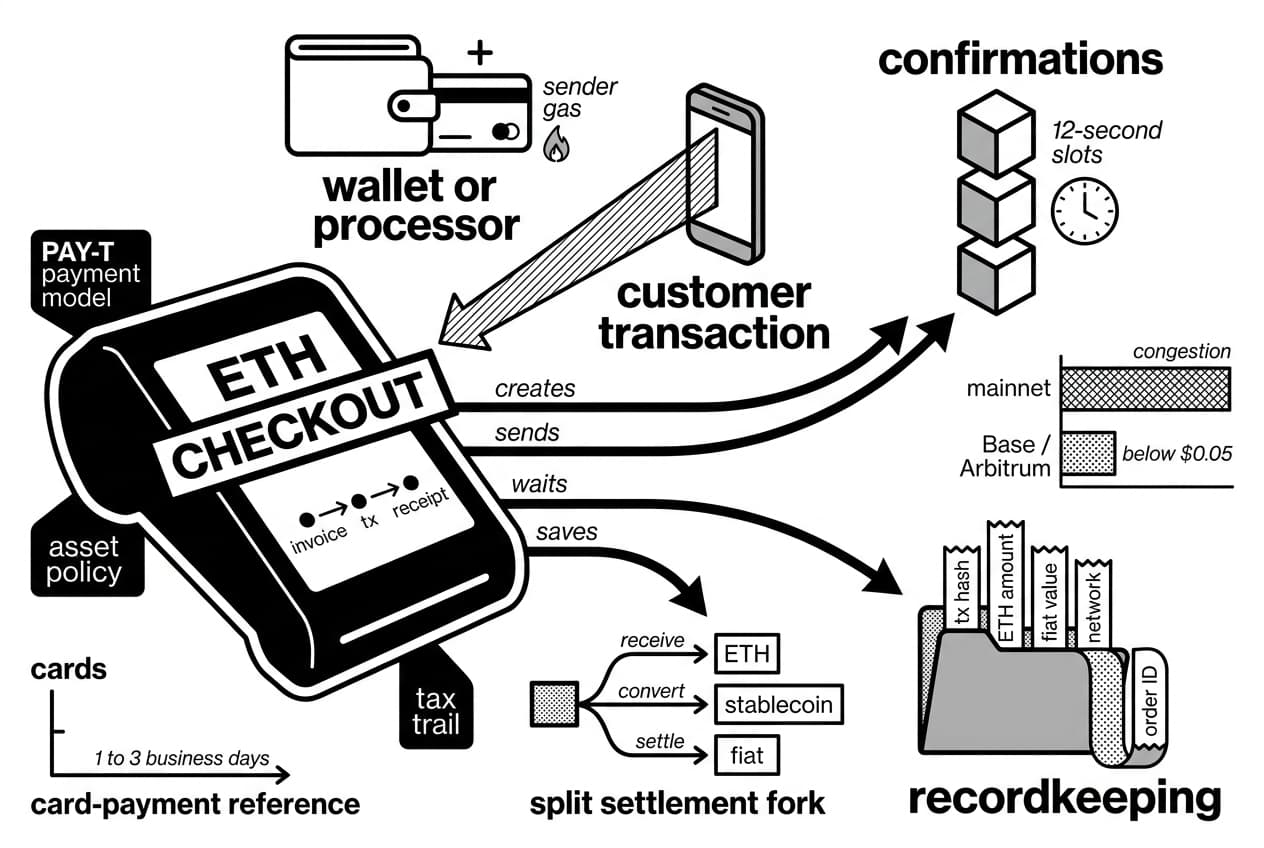
ETH is the asset used to pay gas on Ethereum. If you need a refresher before setup, read what ETH and gas fees are. The important merchant point is that the sender usually pays network gas, while you choose whether to receive ETH, auto-convert, or settle into a stablecoin or fiat account.
Ethereum mainnet produces blocks in 12-second slots, according to ethereum.org block docs, accessed March 2026. Leading layer 2 networks often show transfer costs below $0.05, according to L2Fees.info, accessed March 2026. That fee gap is why a $20 digital product may work on Base or Arbitrum but feel expensive on mainnet during congestion.
The common framing is that crypto checkout is mainly a button. A better merchant view is the PAY-T framework: payment model, asset policy, yield or treasury decision, and tax trail. If one of those four is missing, the checkout can cost more in support time and bookkeeping than the card fees you hoped to avoid.
Ethereum payments vs fiat card payments
factor | card payment | ETH on mainnet | ETH on layer 2 |
|---|---|---|---|
settlement timing | often 1 to 3 business days | visible in seconds, usually held until confirmations | often visible in seconds, depending on network and processor |
reversibility | card disputes are possible | irreversible after confirmation | irreversible after confirmation |
merchant fee model | 2.9% plus $0.30 is a common online benchmark from Stripe pricing, accessed March 2026 | sender pays gas, processor may add 0.5% to 1.5% | sender pays lower gas, processor fee may still apply |
volatility | none if settled in local currency | high if you hold ETH | high if you hold ETH, lower if you auto-convert |
best fit | general consumers | higher-value crypto-native payments | small tickets, digital goods, global customers |
For a merchant, irreversibility is both a benefit and a duty. You avoid card chargebacks, but customers cannot appeal to a card network if you make a mistake. Publish refund terms before checkout, and do not release goods until your chosen confirmation threshold is met.
Jeremy Allaire, co-founder and CEO of Circle, is a useful expert reference for this topic because Circle builds stablecoin payment infrastructure. His public company work supports the practical merchant point: many stores want crypto rails without holding volatile ETH on the balance sheet.
Original merchant cost model: card vs ETH checkout
The table below is a generated decision model for this guide, calculated in March 2026 from the cited fee references. It is not a forecast. Use it to see which fee policy can break even for a small order.
sample order | card benchmark | ETH mainnet policy example | ETH layer 2 policy example | merchant lesson |
|---|---|---|---|---|
$20 digital item | $0.88 using 2.9% plus $0.30 from Stripe pricing, accessed March 2026 | $0.20 processor fee plus variable gas paid by customer | $0.20 processor fee plus often under $0.05 network cost from L2Fees.info, accessed March 2026 | layer 2 is usually the safer default for low-value items |
$250 invoice | $7.55 using the same card benchmark | $2.50 at a 1% processor fee, before any conversion spread | $2.50 plus low network cost | ETH can make sense when the customer already holds crypto |
$2,000 service invoice | $58.30 using the same card benchmark | $20.00 at a 1% processor fee, plus treasury risk if you hold ETH | $20.00 plus low network cost | write a same-day conversion rule before accepting large invoices |
Who should consider accepting ETH?
- Digital-goods sellers: software, templates, licenses, game assets, and downloads where card disputes hurt margins.
- SaaS businesses: especially when customers are global and already use wallets.
- Freelancers and agencies: ETH invoices can reduce wire delays, but only if you document exchange rates.
- Web3 apps: users already expect wallet-based payments.
- Donation pages: public transaction hashes can make receipts easier to verify.
If your customers are not crypto users and your average order is under $20, offer ETH as a secondary option first. Do not replace card checkout until you have real conversion data from your own store.
What you will need before you accept Ethereum payments
Set up the operating pieces before you publish a crypto checkout option. Most merchant problems start when a customer pays before the business has decided who controls the wallet, which network is supported, or how refunds work.
Warning: Do not use your personal ETH wallet for business revenue. Mixing personal and business funds makes tax reporting harder and creates access problems when a partner, bookkeeper, or employee needs records.
Merchant setup checklist
- Merchant wallet: create a dedicated business wallet or processor account.
- Checkout method: choose a payment link, hosted invoice, ecommerce plugin, API, or direct wallet address.
- Supported network: state whether you accept Ethereum mainnet, Base, Arbitrum, Optimism, or another network.
- Pricing policy: set rate locks, invoice expiry, and whether prices are denominated in fiat or ETH.
- Refund policy: decide whether refunds use the original ETH amount, fiat value, stablecoin, or store credit.
- Accounting records: save transaction hash, timestamp, ETH amount, fiat value, network, and order ID.
- Security controls: use hardware wallet backup, multisig, two-factor authentication, and withdrawal limits where available.
- Compliance review: check local tax, sanctions, AML, and consumer refund rules before launch.
The 2014 IRS position says virtual currency received for goods or services is income at fair market value on the date received, according to IRS virtual currency guidance, 2014. The IRS also expanded digital asset reporting material in IRS digital asset guidance, accessed March 2026.
Custodial vs non-custodial requirements
A custodial processor can generate invoices, watch the chain, trigger order updates, and settle into fiat or stablecoins. You give up some control, but you reduce day-one operational work.
A non-custodial wallet gives you direct control of funds. You must protect seed phrases, approve withdrawals, monitor incoming transactions, and maintain your own accounting trail. If you are unsure, compare the security trade-offs in custodial vs non-custodial wallets.
Vitalik Buterin, co-founder of Ethereum, is relevant here because Ethereum was designed around user-controlled accounts and public settlement. For merchants, that design means you can receive funds directly, but you also inherit the job of key security.
Step 1: choose your Ethereum payment model to accept Ethereum payments
Pick the model before you create public payment instructions. The right choice depends on volume, staff skill, refund needs, and whether you want to touch ETH directly.
payment model | best for | custody type | technical difficulty | typical fees | main risk |
|---|---|---|---|---|---|
direct wallet | freelancers, donations, low-volume invoices | self-custody | low | network gas paid by sender | manual reconciliation errors |
hosted processor | small and midsize stores | custodial or hybrid | low | often 0.5% to 1.5% plus conversion spread | processor dependency |
ecommerce plugin | stores already using WooCommerce, Shopify, or similar software | varies by provider | low to medium | plugin fee plus processor fee | plugin updates can break order status mapping |
API integration | custom apps, SaaS, marketplaces | self-custody, custodial, or hybrid | high | API fee plus network costs | webhook and key-management mistakes |
smart contract flow | escrow, splits, subscriptions, protocol-native payments | on-chain self-custody | very high | deployment gas plus call gas | contract bugs and audit cost |
layer 2 micropayment flow | paywalls, metered APIs, AI-agent requests | usually self-custody | medium to high | often under $0.05 per transfer on leading layer 2s, from L2Fees.info, accessed March 2026 | customer network confusion |
Direct wallet payments
Use a direct wallet when you send a few invoices a month and can manually match payments. Put the exact address, network, amount, expiry time, and order ID on the invoice.
The risk is reconciliation. If two customers send similar amounts, you need transaction hashes and timestamps to match each payment. Once you handle more than 20 to 30 crypto orders per month, a processor or plugin usually saves time.
Payment processors and plugins
A processor creates a unique invoice, watches the blockchain, updates payment status, and sends webhooks or emails. In a dashboard, the setup usually looks like this: click Create payment link, select ETH, set the fiat amount, choose the network, and copy the checkout URL.
For ecommerce plugins, install the official plugin from your store admin, paste the API key, set order statuses, and run a test order. Do not skip status mapping. A common mistake is leaving expired invoices marked as paid or leaving confirmed orders stuck in pending.
APIs, smart contracts, and micropayments
Use an API when you control the checkout and need custom logic. Store the secret key server-side only, create invoices from your backend, display the returned address and QR code, and verify every webhook signature before changing order status.
Smart contracts are powerful for splits, escrow, and subscription-like flows, but they need review before handling customer funds. Hayden Adams, founder of Uniswap, is an approved topical reference because Uniswap made on-chain transaction flows familiar to many users, but merchant checkout still needs clearer refund and support rules than a swap interface.
Step 2: create and secure your receiving wallet
After you choose the model, create the account that will receive funds. Keep business funds separate and write down who can view, move, and export transaction data.
Pick a wallet type
wallet type | who controls keys | best for | main risk |
|---|---|---|---|
exchange account | the exchange | beginners who want fiat conversion | withdrawal limits and account review |
software wallet | you | small daily balances | device compromise |
hardware wallet | you | larger balances and cold storage | loss if backup is poor |
multisig wallet | multiple approved signers | teams and higher-value treasuries | coordination errors |
processor-hosted wallet | the processor | fast launch and reporting | counterparty risk |
For many small merchants, a software wallet for daily operations plus a hardware wallet for retained ETH is a practical start. If you are deciding between an exchange account and cold storage, read hardware wallet vs exchange custody.
Team operations should consider multisig so no single person can drain the account. The Safe ecosystem reports more than $100 billion in assets secured on its platform, according to Safe, accessed March 2026.
Back up and restrict access
Write the seed phrase offline and store backups in at least two secure physical places. Never paste it into a website, support chat, spreadsheet, shared document, or cloud-synced password note.
Warning: No legitimate plugin, wallet, tax tool, or support agent needs your seed phrase. If a page asks for it, close the tab and assume it is malicious.
For employees, use the lowest permissions possible. Staff may need to create invoices and check payment status, but they usually do not need withdrawal rights. Keep only 24 to 48 hours of expected receipts in a hot wallet, then sweep the rest to cold storage on a written schedule.
Step 3: connect Ethereum to your checkout
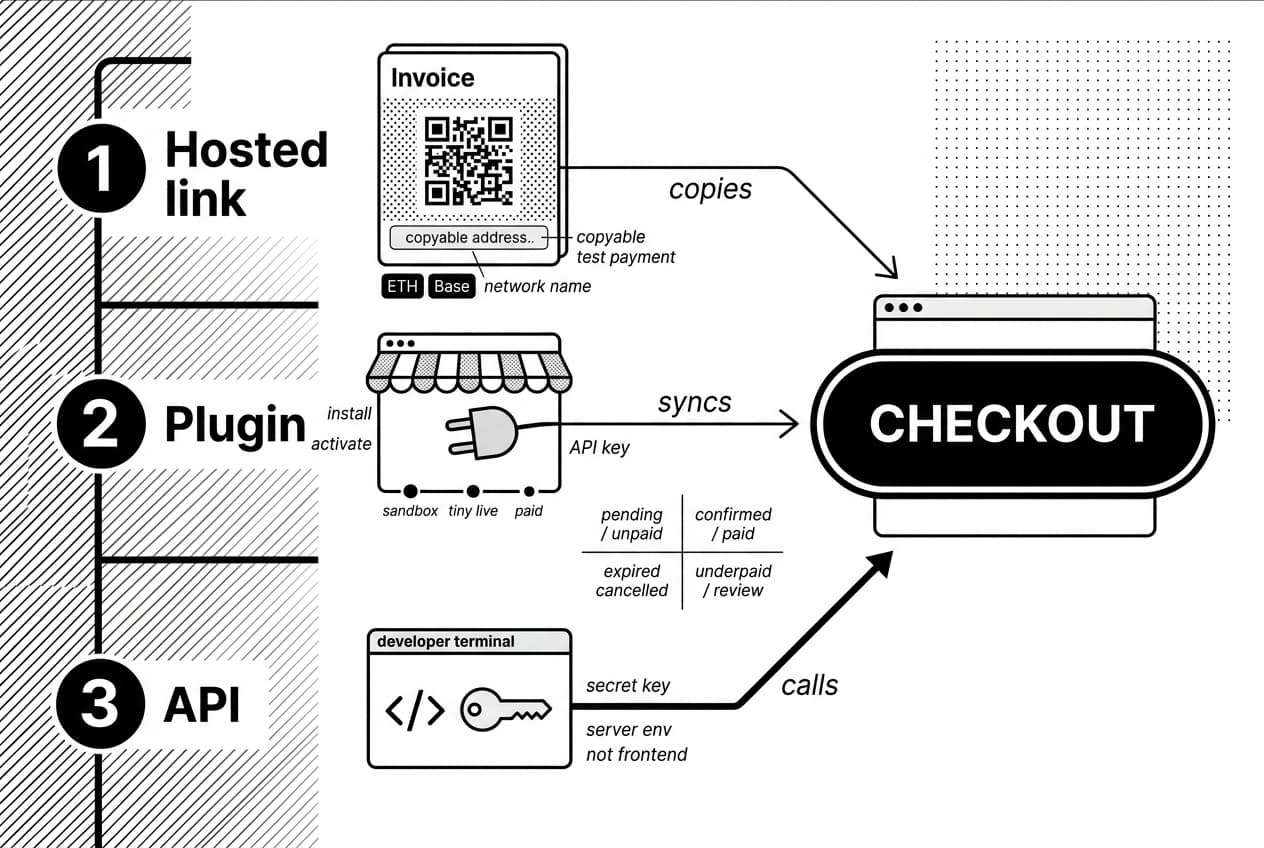
Now connect the wallet or processor to the place where customers pay. Choose one of three paths: hosted link, ecommerce plugin, or API.
Use a hosted checkout or payment link
- Create a merchant account with your chosen processor and complete identity checks if required.
- Open the dashboard section labeled payment links or invoices.
- Click create new link, enter the fiat price, and select ETH or a stablecoin settlement option.
- Choose the supported network. If you accept Base, do not label the invoice only as ETH.
- Copy the URL and add it to your checkout button, invoice email, or PDF.
- Send a small test payment before showing the link to customers.
Pro tip: Put the network name next to the QR code and again under the copyable address. Many lost-payment support tickets begin with a customer sending funds on the wrong network.
Install an ecommerce plugin
- Open your store admin and go to the plugin or app marketplace.
- Search for the official plugin from your chosen processor.
- Click install, then click activate.
- Open plugin settings and paste the API key from the processor dashboard.
- Select ETH and the networks you will support.
- Map statuses so pending means unpaid, confirmed means paid, expired means cancelled, and underpaid means manual review.
- Place a test order using sandbox mode if available, then repeat with a tiny live payment.
Build with an API
- Create an API key in the developer dashboard.
- Store the secret key in server environment variables, not frontend code.
- Call the invoice endpoint from your backend with order ID, fiat amount, asset, and network.
- Display the returned payment address, QR code, exact amount, and expiry timer.
- Register a webhook URL for payment updates.
- Verify webhook signatures before changing order status.
- Define actions for underpayment, overpayment, late payment, and duplicate callbacks.
Warning: If an invoice expires after 15 to 20 minutes, do not release goods because funds appear later. Mark the order for review or generate a fresh invoice at a new rate.
Step 4: configure prices, fees, networks, and settlement
This is where you prevent most expensive mistakes. Set the price logic, rate lock, network labels, gas expectations, and settlement rule before going live.
Set pricing and conversion rules
Most merchants should price products in local currency and let the processor quote the ETH amount at checkout. A 10 to 15 minute rate lock is common, but the invoice must expire when that lock ends.
Every invoice should show the exact ETH amount, destination address, network, expiry time, and order ID. If a customer underpays, either request the difference or hold the order for manual review. If a customer overpays, decide whether the surplus becomes store credit or triggers a refund.
Plan for gas fees and confirmations
Mainnet gas changes with demand, so check the current quote on the Etherscan gas tracker, accessed March 2026 before deciding whether to push customers to mainnet. For small orders, layer 2 support often improves completion because the visible fee is lower.
If you want to pay gas on behalf of customers, read gasless transactions and meta-transactions. That approach can improve user experience, but it moves cost and abuse prevention onto you.
For most retail orders, wait for at least 1 confirmation on a layer 2 and 3 confirmations on mainnet. For high-value physical goods, use 6 mainnet confirmations or manual review.
Decide whether to hold or convert ETH
Write your treasury rule before the first payment. Choose one of these policies and apply it consistently.
- Hold ETH: you keep upside and downside price exposure.
- Auto-convert to fiat: useful for payroll, inventory, and tax predictability.
- Convert to stablecoin: keeps funds on-chain while reducing ETH volatility.
- Sweep to cold storage: move retained ETH out of the hot wallet at a fixed threshold, such as every $500 in receipts.
Jeremy Allaire, co-founder and CEO of Circle, is relevant because Circle operates USDC infrastructure. For merchants, stablecoin settlement can be the middle path between card rails and holding volatile ETH.
Step 5: test the full Ethereum payment flow
Do not go live after setup alone. Run a full payment from order creation through refund testing. This is the fastest way to catch wrong networks, broken webhooks, and missing accounting fields.
Run a small live test payment
Testnets help developers, but they do not always mirror real wallet behavior. Send a $1 to $2 live payment on the same network customers will use. Record each event in a test log so you can repeat the process after plugin updates.
Sample test-log transcript, March 2026: order created at 10:02, invoice generated at 10:03, wallet sent payment at 10:05, transaction hash saved at 10:05, order marked paid after confirmation, receipt email sent, CSV export checked, refund path reviewed.
Use this numbered launch-test checklist before going live:
- Create a test order with a low-value product.
- Generate the invoice and check amount, network, expiry timer, and address.
- Send a small payment from a wallet by scanning the QR code, then repeat by copying the address.
- Confirm the transaction on the correct block explorer.
- Verify order status changes from pending to paid without manual editing.
- Check webhook and email logs for successful delivery.
- Export the record and confirm timestamp, fiat value, ETH amount, network, and order ID.
- Test the refund process with a partial or full refund if your provider supports it.
Fix common checkout errors
error | likely cause | fix |
|---|---|---|
wrong network | customer sent funds on mainnet instead of a layer 2, or the reverse | show a network badge beside the QR code and address |
expired invoice | customer paid after the rate lock ended | add a refresh invoice button and manual review queue |
insufficient gas | customer lacks ETH for the network fee | show the estimated fee before the final payment step |
incorrect amount | customer rounded the ETH amount | encourage QR scanning and reject underpayments clearly |
delayed exchange withdrawal | customer sent from an exchange that batches withdrawals | add a notice that exchange withdrawals may take 30 to 60 minutes |
wallet connection failure | unsupported wallet or browser extension conflict | test with MetaMask, the Coinbase wallet app, and WalletConnect |
Pro tip: Add support text that says payment is not complete until it appears on the correct network explorer. That single sentence reduces panic when an exchange shows sent before the blockchain shows received.
Step 6: handle refunds, accounting, taxes, and compliance
Getting paid is only half the process. Every ETH receipt creates accounting and tax records, and some businesses may also trigger compliance duties.
Record every transaction
For each payment, save the transaction hash, timestamp, ETH amount, fiat value at receipt, network, processor fee, order ID, and customer invoice number. Export processor reports or wallet history at least monthly.
Map on-chain transactions to internal orders in your accounting tool or spreadsheet. Higher-volume merchants should review crypto business compliance requirements, especially if they handle regulated products, large transfers, or international customers.
Create a refund policy before launch
Choose one refund method and disclose it at checkout.
- Same ETH amount: refund the exact ETH quantity received.
- Fiat-equivalent amount: refund the local-currency value at original purchase time, paid in ETH or another method.
- Stablecoin refund: refund a dollar-denominated amount on-chain.
- Store credit: issue credit in your store account system.
Warning: Never promise a full ETH refund without defining whether full means the original ETH quantity or the original fiat value. If ETH doubles after the sale, that wording can become an expensive dispute.
When volume grows, work with a crypto tax accountant who understands transaction hashes, cost basis, and processor exports. Do this before tax season, not after you have hundreds of unmatched wallet entries.
Frequently Asked Questions
- How to receive Ethereum payments?
- To receive Ethereum, you need an Ethereum-compatible wallet or a merchant payment processor that generates a receiving address or invoice. Share your address carefully, confirm you're on the correct network, and wait for enough block confirmations before releasing goods. Always save the transaction ID for your accounting records.
- Who accepts Ethereum as payment?
- Ethereum is commonly accepted by Web3 companies, digital goods sellers, freelancers, SaaS businesses, donation platforms, and some ecommerce stores. Certain travel booking and gift card services also support it. Acceptance varies by region and processor availability, and many merchants automatically convert ETH to fiat at the point of sale.
- How to pay someone with Ethereum?
- Open your crypto wallet, tap Send, and carefully paste the recipient's Ethereum address — never retype it manually. Enter the amount, verify you're on the correct network, and review the gas fee before confirming. For large payments, send a small test transaction first, and never copy an address from an unverified source.
- Can I receive Ethereum on PayPal?
- PayPal offers crypto features in select countries, but availability, supported assets, and withdrawal rules change regularly. Before relying on it for business payments, verify current 2026 policies directly with PayPal. Unlike self-custody wallets, PayPal holds crypto on your behalf, which means different rules around transfers, checkout use, and fund access.
Sources
Author

Crypto analyst and blockchain educator with over 8 years of experience in the digital asset space. Former fintech consultant at a major Wall Street firm turned full-time crypto journalist. Specializes in DeFi, tokenomics, and blockchain technology. His writing breaks down complex cryptocurrency concepts into actionable insights for both beginners and seasoned investors.