How to Use Hardware Wallet Safely: Best Practices 2026 Guide
Introduction: What You Will Accomplish With This Guide
By the end of this guide, you will know how to use hardware wallet storage safely from purchase to recovery drill. You will buy from a safe source, initialize the device, protect the recovery phrase, verify addresses on the device screen, connect to MetaMask carefully, and test recovery before an emergency.
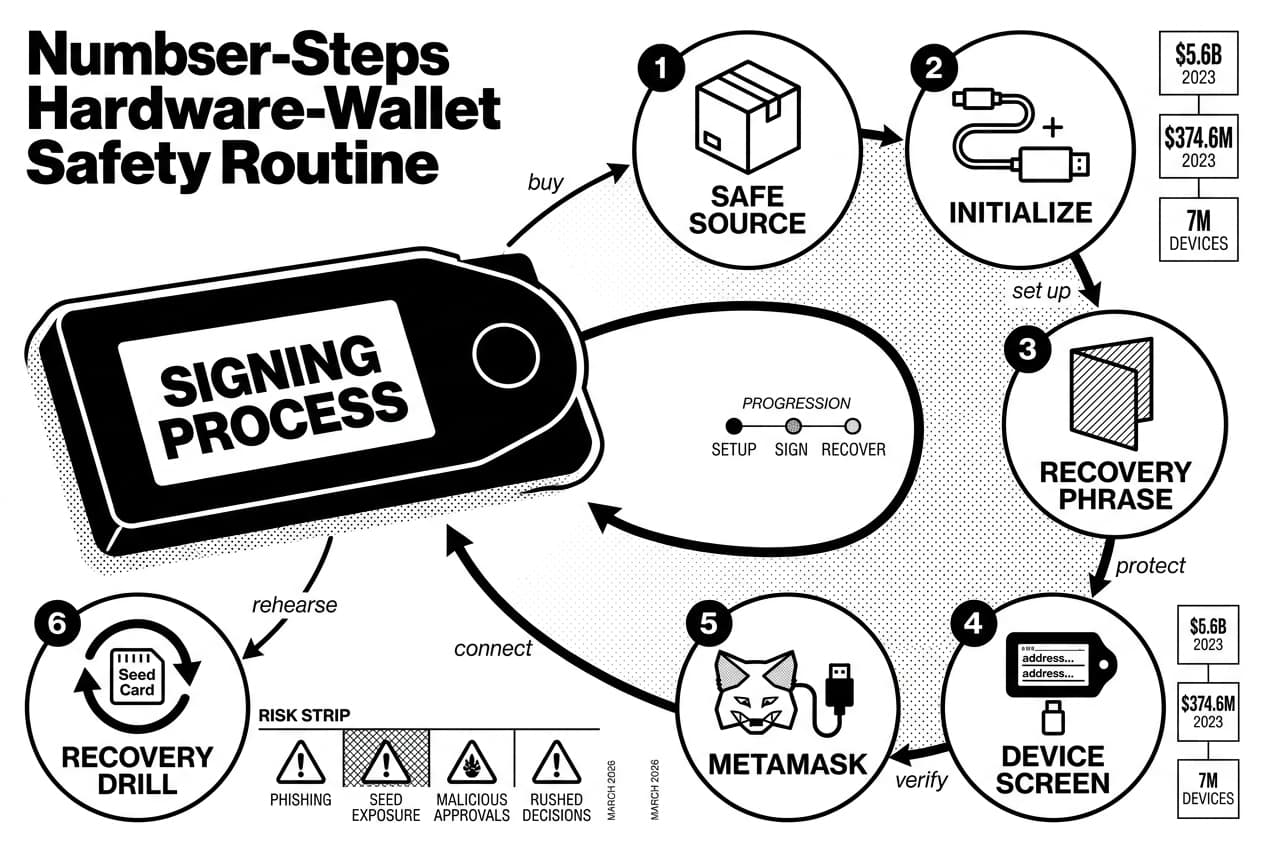
The important point is simple: a hardware wallet is not magic. It is safer only when your setup, backup, signing habits, and recovery plan are disciplined. Most losses come from phishing, seed phrase exposure, malicious approvals, and rushed user decisions rather than a failure of the device chip.
Evidence base, as of March 2026: this guide combines vendor security instructions, public law-enforcement loss data, blockchain crime reporting, and repeatable self-custody drills. The FBI logged more than $5.6 billion in cryptocurrency-related losses in 2023 (FBI IC3, 2023). Chainalysis estimated that approval-phishing scammers stole at least $374.6 million in 2023 (Chainalysis, 2024). Ledger said it had sold more than 7 million devices by late 2023 (Ledger, 2023). Those numbers support the main lesson: your signing process matters.
Andreas Antonopoulos, author and educator, has long taught that controlling your keys also means accepting responsibility for the process around those keys. This guide turns that principle into an operating routine you can follow.
Who This Guide Is For
This guide is written for you if you are moving funds off an exchange, starting with DeFi, storing NFTs, or learning self-custody for the first time. No prior technical background is assumed.
- Exchange users: you want to withdraw coins without sending them to the wrong address.
- DeFi users: you want to stop approving transactions you do not understand.
- NFT holders: you want valuable assets away from a browser-only wallet.
- Long-term holders: you want a recovery plan your future self can execute calmly.
We will use two named routines throughout the article: the Cold Setup Loop and the Three-Screen Check. The Cold Setup Loop means buy clean, initialize privately, back up offline, test small, then rehearse recovery. The Three-Screen Check means compare the browser, the wallet app, and the device screen before you approve any outgoing action.
Understand What a Hardware Wallet Actually Protects
A hardware wallet is a physical device that keeps your crypto private keys offline, signs transactions inside the device, and requires on-device confirmation before a transaction can be broadcast. Your computer prepares the transaction, but the hardware wallet protects the signing key and shows what you are approving.
The device protects private-key signing. It does not protect you from entering your seed phrase into a fake website, approving a malicious contract, or storing your recovery phrase where another person can find it.
What Are Cryptographic Keys?
Your public address is the destination other people can use to send you crypto. Your private key is the secret that authorizes spending from that address. You can share the public address; you never share the private key.
Your seed phrase, also called a recovery phrase, is a human-readable backup of the wallet. It is usually 12 or 24 words depending on the device standard and setup path (BIP-39 specification, 2013). Anyone with those words can restore the wallet and move the funds.
This is the core tradeoff of self-custody wallet rules: you remove exchange custody risk, but you become responsible for backup, privacy, and transaction review.
How Does a Hardware Wallet Work?
- Your computer or phone prepares an unsigned transaction. It includes the recipient address, amount, network, and fee.
- The unsigned transaction is sent to the hardware wallet. This may happen through USB, Bluetooth, or QR flow, depending on the model.
- The device signs internally. The private key stays inside the hardware wallet.
- You confirm on the device screen. You check the address, amount, fee, and contract details where available.
- The signed transaction returns to the app. The app broadcasts it to the network.
If your laptop is infected, the attacker still needs you to approve the transaction on the physical device. That is the main security value. You are not trusting the browser; you are trusting what the device screen shows.
What a Hardware Wallet Does Not Protect You From
Threat | How It Works | Why the Device Cannot Save You |
|---|---|---|
Phishing site | A fake wallet or exchange page asks for your recovery phrase. | If you type the phrase online, the wallet is compromised. |
Malicious approval | A contract gets permission to spend more tokens than you intended. | You approved a real transaction, so the device signs it. |
Fake support message | A scammer claims your wallet needs urgent verification. | Real support will not ask for your seed phrase. |
Address poisoning | An attacker creates a similar-looking address to trick copy and paste habits. | The device signs the address you confirm. |
Poor seed storage | Your written backup is photographed, scanned, or found. | Physical or digital seed exposure bypasses the device. |
The safest mindset is to treat the hardware wallet as one layer in a system. The device, seed backup, PIN, software source, signing review, and recovery drill all have to work together.
Gather What You Need Before Setup
Prepare before you connect the device. Give yourself 30 to 60 minutes in a private room for the first setup (Ledger setup guidance, 2024). Do not rush this session, and do not start while distracted.
You will need a brand-new device purchased from the maker or an authorized reseller, a clean computer or phone, the official cable, paper or a metal seed backup, and internet access for the official companion software.
What You Will Need
- New hardware wallet: buy direct from the maker or a listed reseller. Do not buy secondhand.
- Clean computer or phone: update the operating system first and avoid shared machines.
- Official cable: use the cable from the box for the first setup.
- Pen and backup material: use paper for testing, then consider metal for long-term storage.
- Private workspace: no cameras, screen sharing, or visitors while the seed words are visible.
Setup Checklist
Before you press the first button, run this checklist. Each item blocks a common failure mode.
- Close video apps: shut down meeting, chat, and streaming apps before the recovery phrase appears.
- Cover cameras: turn phone cameras away and cover webcams.
- Turn off screen sharing: confirm nothing is broadcasting your screen.
- Keep cloud notes closed: never type the seed into synced notes, cloud documents, email, or a password manager.
- Remove distractions: do not set up the wallet while messaging, gaming, or trading.
Warning: a seed phrase in a photo, cloud document, printer queue, or chat message should be treated as exposed. If that happens, create a new wallet and move the funds before adding more assets.
Before You Move Large Funds
Start with a small test amount. For most beginners, $5 to $20 is enough to prove the receive and send workflow without risking meaningful funds (Coinbase transaction guide, 2024). Send it in, confirm it, then send a small amount back out.
Also confirm asset and network support. For example, the XRP network requires a minimum account reserve; the base reserve is listed as 1 XRP in current network documentation (XRP documentation, 2025). Some exchanges also require destination tags for XRP deposits.
Asset Type | What to Verify First |
|---|---|
BTC | Use the bitcoin network and a bitcoin address format. |
ETH | Confirm whether you are using mainnet or a layer-2 network. |
Stablecoins | Match the token and network on both the sending and receiving side. |
XRP | Check reserve rules and destination-tag requirements before exchange transfers. |
NFTs | Confirm that the wallet interface can display or manage the token type you hold. |
Once your workspace is private and your asset support is confirmed, you are ready for the first step.
Step 1: Buy and Inspect the Hardware Wallet
Your first action is to buy a device you can trust. A safe setup starts before the package arrives.
Verify the Source
Buy from the official maker site or an authorized reseller list. If you are choosing between common models, our Ledger vs Trezor comparison explains the tradeoffs, and our Ledger device comparison helps if you are leaning toward that brand.
Avoid secondhand marketplaces and private sellers. When the package arrives, check for broken seals, strange residue, resealed packaging, missing cards, or instructions that tell you to use an unofficial website.
A genuine device creates the recovery phrase during your first setup. It should not arrive with words already printed, scratched, or handwritten for you.
Warning: reject any prefilled recovery phrase
If the box contains a recovery sheet that already has words on it, stop. Do not connect the device, do not deposit funds, and do not test the seed. Photograph the package for evidence and contact the seller through an official support channel. Trezor warned about counterfeit and tampered hardware threats in an official 2024 advisory (Trezor advisory, 2024).
Step 2: Initialize the Wallet and Write Down the Recovery Phrase
This is the highest-stakes setup step. The device will create the seed phrase, and your job is to copy it exactly without letting it touch the internet.
The Full Setup Process at a Glance
- Unbox the device and connect it with the official cable.
- Install the official app from the maker website, not from an ad or email link.
- Choose "set up as new device" on the device screen.
- Write the seed phrase word by word on paper or metal.
- Confirm the seed phrase on the device when prompted.
- Set a PIN that is at least six digits and not easy to guess.
- Install only needed coin apps for the assets you plan to hold.
- Receive a small test transaction before moving a larger balance.
Create a New Wallet on the Device
When the setup screen asks what you want to do, choose the new-device option. Do not choose restore unless you already have a seed phrase from a wallet you own.
The device will show each seed word one at a time. Write every word in order. Check spelling carefully because one wrong word can make recovery fail.
Back Up the Seed Phrase Offline
Your seed phrase is the wallet backup. Anyone who has it can restore your funds on a compatible wallet, even without the physical device.
Never store the seed phrase in these places:
- A password manager or browser extension
- An email draft or sent message
- A cloud drive or synced note
- A photo, screenshot, scan, or printer queue
- A chat app, SMS thread, or social message
- Any website that asks you to verify, fix, or sync the phrase
Andreas Antonopoulos, author and educator, has repeatedly emphasized in public self-custody education that secrets lose their value once exposed to internet-connected systems. Keep the seed offline from the beginning.
Pro Tip: Use a Fire- and Water-Resistant Backup
Paper is fine for initial setup, but it is weak against fire, water, and fading ink. For balances you would be upset to lose, consider a metal backup. Ledger states that its recovery-check workflow is designed so users can confirm a phrase without typing it into a computer (Ledger recovery check, 2022).
A practical storage plan is one backup in a home safe and one backup in a trusted off-site location. Do not create a complicated splitting system unless you have practiced recovery with it.
Step 3: Configure Your PIN, Passphrase, Firmware, and Apps
Your seed is written down. Now you will protect the physical device, decide whether advanced features are needed, and update the software safely.
Set a PIN You Can Remember but Others Cannot Guess
The PIN protects the device if someone steals it. It does not replace the seed phrase. A thief with only the device still has to defeat the PIN, but a thief with the seed can restore the wallet elsewhere.
Use at least six digits. Avoid birthdays, repeated digits, and sequences such as 123456. Never write the PIN on the same paper as the recovery phrase.
Decide Whether You Need a Passphrase
A passphrase acts like an extra secret added to the seed phrase. It can create a separate wallet, but it also adds a new way to lose funds.
If you forget the passphrase or enter it differently, the wallet you expect may not appear. Beginners should usually wait until they have practiced basic recovery before adding this feature.
Update Firmware Safely
Update only through the official app from the device maker. Ledger published firmware update instructions and security notes for device updates through its official support site (Ledger update support, 2024).
Before a major update, make sure your recovery phrase is physically available. Rare update problems can require restoration. Confirm update prompts on the device screen, not only on the computer.
After the firmware is current, install only the coin apps you need. Fewer apps reduce clutter and make transaction review easier.
Step 4: Receive Crypto With a Small Test Transaction
Now you will receive funds safely. The goal is not speed; the goal is to prove the address, network, and confirmation process before you trust the wallet with more money.
Verify the Address on the Device Screen
Open the official wallet app, choose the correct account, and click Receive. The computer will show an address. Pause before copying it.
Your hardware wallet should show the same address on its own screen. Compare the beginning, middle, and end of the address. For a first transfer, compare the full string if the screen allows it.
Warning: if the address on the device differs from the address on the computer, do not send. Disconnect, check that you installed the official app, and scan the computer for malware.
Clipboard malware can replace copied addresses. The device screen is your trusted display because the private key and signing confirmation live there.
Use the Correct Network
Network mistakes are common because some assets exist on several chains. Sending a token on the wrong network can require advanced recovery, and sometimes recovery is not practical.
What You Are Sending | Correct Network | Common Mistake |
|---|---|---|
BTC | Bitcoin mainnet | Sending to an ethereum-style address |
ETH | Ethereum mainnet or the exact layer-2 selected | Choosing the wrong withdrawal network |
USDC | The same network on both sides | Mixing ethereum, polygon, tron, or solana rails |
XRP | The XRP network | Forgetting an exchange destination tag |
Check the network selector on the sending exchange and inside your wallet app. If the labels do not match, stop and research before sending.
Wait for Confirmations
After sending the test amount, copy the transaction hash and check it in a block explorer. Bitcoin deposits often require 3 to 6 confirmations before services treat them as final (Coinbase, 2024). Exchanges may require more.
Do not move your full balance until the test transaction appears in the correct account and, if possible, you have sent a small amount back out.
Pro Tip: your first test transfer is not wasted time. It confirms the device, address, network, app, and your own workflow before larger funds are involved.
Step 5: Send, Swap, or Connect to MetaMask Safely
Sending and DeFi use are where hardware wallet safety tips matter most. The browser may show friendly buttons, but your final trust anchor is still the device screen.
Review Every Transaction Before You Sign
When MetaMask or a dApp asks you to confirm, read the hardware wallet screen before pressing the physical approval button. Check the recipient, amount, token, network, and fee.
For addresses, compare at least the first four and last four characters, then inspect more if the transaction is large. Address-poisoning scams rely on people checking only a tiny part of the address history.
Connect to MetaMask Without Importing Your Seed
Open MetaMask, select the account menu, choose Add hardware wallet, and follow the pairing flow for your device. Your seed phrase stays on the hardware wallet. Never type it into MetaMask, a browser extension, or a website.
If you are comparing DeFi wallet options, see our MetaMask and DeFi wallet comparison. The right interface is the one that helps you understand what you are signing.
Hayden Adams, founder of Uniswap, represents the side of crypto where users interact directly with smart contracts. That freedom is useful, but it makes approval review a daily safety habit rather than an optional extra.
Warning: Be Careful With Blind Signing and Token Approvals
Blind signing means the device cannot show all transaction details in human-readable form. You may see a hash or limited contract data instead of a plain explanation. Treat that as higher risk.
Use these rules before interacting with DeFi or NFT contracts:
- Type important site addresses manually or use bookmarks you created yourself.
- Do not follow surprise links from social posts, direct messages, or airdrop claims.
- Use a separate hot wallet for experiments, mints, and new protocols.
- Set token spend limits when possible instead of unlimited approvals.
- Review and revoke stale approvals after you finish using a protocol.
Watch for fake airdrop scams, review common crypto scams and red flags, and verify addresses carefully if you plan to cash out crypto to fiat safely.
Use the Three-Screen Check before every outgoing action: compare the dApp or exchange page, the wallet interface, and the hardware wallet screen. Approve only when all three agree with what you intended to do.
Action | Main Risk | Key Safeguard |
|---|---|---|
Receiving crypto | Fake deposit address | Verify the receive address on the device screen. |
Sending crypto | Clipboard malware or address poisoning | Compare the address on the device before signing. |
Swapping tokens | Wrong asset, fee, or slippage | Confirm asset type and amount on the device and review the quoted terms. |
NFT minting | Malicious contract or blind signing | Use a small hot wallet and keep blind signing off by default. |
DeFi approvals | Unlimited token spend permission | Set limits and revoke old approvals after use. |
MetaMask connections | Typing the seed phrase into a browser | Use the hardware-wallet pairing flow only. |
Step 6: Test Recovery and Maintain Long-Term Security
A backup you have never tested is only a guess. Test recovery while the wallet balance is still small and the situation is calm.
Practice a Recovery Drill
The safest basic drill is to use the official recovery-check feature on the device, if your model offers one. The check should happen on the hardware wallet screen, not in a text box on your computer.
If you own a spare device, restore the seed phrase on that spare, verify the same addresses appear, then wipe the spare again. This proves that your words, order, and recovery process work.
Warning: never type your seed phrase into a website or browser extension that claims to verify it. Legitimate recovery checks do not need your seed entered into an internet-connected form.
Separate Device, PIN, and Recovery Phrase
Do not store the device, PIN, and recovery phrase together. If a thief finds all three, the security model collapses.
Keep the device in a locked location. Keep the seed phrase in a separate offline location, ideally one that resists fire and water. Keep the PIN in your memory or in a separate estate plan, not beside the seed.
Write a plain-language note for a trusted heir. It should explain that crypto exists, where instructions are stored, and who to contact for help. It does not need to include the seed phrase itself.
Respond Quickly if the Seed Phrase Is Exposed
If your recovery phrase may have been seen, photographed, typed, or copied, assume the wallet is compromised. Waiting to see what happens is dangerous.
- Create a brand-new wallet on a clean device.
- Write down the new seed phrase offline.
- Move the highest-value assets first.
- Check the network and destination before each transfer.
- Stop using the old wallet forever after funds are moved.
Scenario | Immediate Action | Priority |
|---|---|---|
Device lost | Assess whether the seed was stored nearby; migrate funds if it was. | Medium |
Device damaged | Restore from the seed phrase on a new device. | Low if the seed is safe |
Seed phrase exposed | Create a new wallet and transfer assets immediately. | High |
Suspicious approval signed | Revoke approvals and move assets if needed. | High |
Repeat a recovery drill at least once a year. Check for firmware updates every few months, and review token approvals after active DeFi periods.
Summary and Next Steps: Your Hardware Wallet Safety Checklist
You have now walked through the full hardware wallet safety system: buy clean, initialize privately, back up offline, verify on-device, test small, connect carefully, and rehearse recovery.
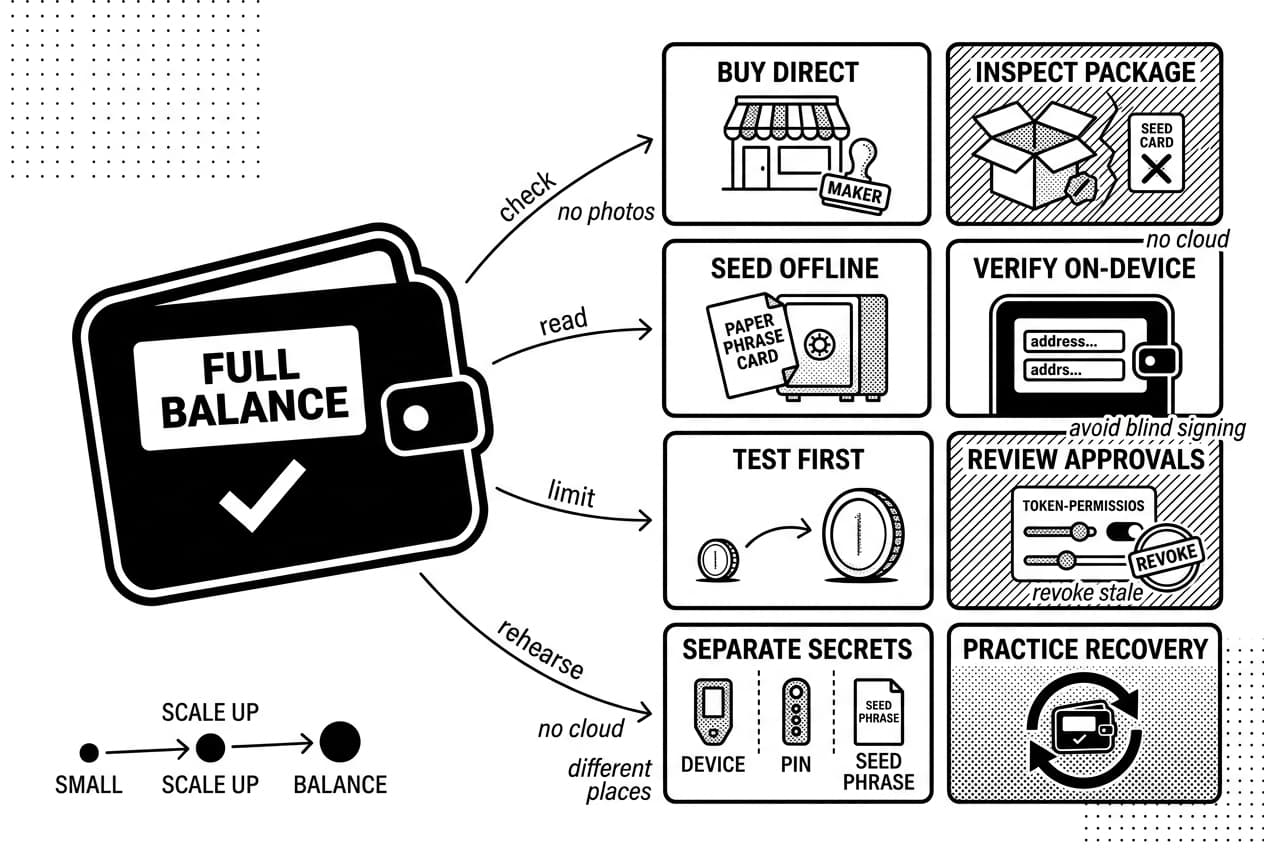
Use this checklist before moving your full balance. It is the shortest version of the hardware wallet best practices in this guide.
Quick Checklist Before Moving Your Full Balance
Hardware wallet best practices checklist
- Buy direct: purchase from the official maker or an authorized reseller.
- Inspect the package: reject prefilled seed cards, strange instructions, or tampered seals.
- Never digitize your seed: no photos, cloud notes, emails, scans, or password managers.
- Verify on-device: read the address, amount, network, and approval details on the hardware wallet screen.
- Test first: send a small amount before moving a large balance.
- Review approvals: avoid blind signing, limit token permissions, and revoke stale approvals.
- Separate secrets: keep the device, PIN, and seed phrase in different places.
- Practice recovery: test your backup before you need it.
Start with an amount you can afford to lose if you make a mistake. After the test works, scale up slowly. Self-custody rewards patience, repetition, and clear checks.
Frequently Asked Questions
- How does a hardware wallet work?
- A hardware wallet stores your private keys offline and signs transactions entirely inside the device. Your connected computer or phone builds the transaction, but the private key never leaves the hardware. Before anything broadcasts to the blockchain, you physically confirm the transaction details on the device's screen.
- What are the disadvantages of a hardware wallet?
- Hardware wallets cost money, require setup time, and have a learning curve. They are less convenient than hot wallets for quick transactions. The biggest drawback is self-custody accountability — if you lose your recovery phrase, the manufacturer cannot restore your funds. Device loss, firmware updates, and fire or water damage are also real risks.
- What is the easiest hardware wallet to use?
- There is no single easiest option for everyone. Ease depends on which coins you hold, screen size, companion app quality, mobile support, and whether you need DeFi access. Compare reputable wallets like Ledger and Trezor against your specific assets and technical comfort level before deciding.
- Which hardware wallet is the most secure?
- Security depends on device design, whether it uses a secure element or open-source model, firmware practices, and supply chain integrity. User behavior matters just as much as hardware. The most secure wallet is ultimately the one you fully understand and can operate correctly — a feature-rich device used carelessly offers weak protection.
- Can someone steal my Bitcoin if they have my wallet address?
- No. A public wallet address alone cannot be used to spend your Bitcoin. It does expose your transaction history and balance on the public blockchain, which is a privacy concern. Actual theft requires access to your private key, recovery phrase, or tricking you into signing a malicious transaction.
- Where is the safest place to keep your hardware wallet?
- Store the physical device in a home safe or locked, secure location. Your recovery phrase needs separate, offline protection — ideally resistant to fire and water damage. Never keep the recovery phrase stored alongside your PIN or the device itself, as that combination makes theft far easier for anyone who finds it.
- Can I transfer money from my Bitcoin wallet to my bank account?
- Bitcoin cannot move directly into a bank account. You typically send BTC to a regulated exchange or broker, sell it for your local currency, then withdraw the fiat to a linked bank account. Factor in exchange fees, withdrawal fees, and network transaction fees when calculating what you will actually receive.
- Can the FBI track a BTC wallet?
- Bitcoin transactions are publicly visible on the blockchain, and law enforcement agencies work with blockchain analytics firms to trace activity. Wallet addresses are pseudonymous rather than anonymous — exchange records, IP addresses, transaction patterns, and legal subpoenas can all connect on-chain activity to real identities in an investigation.
- Should I put my XRP in a hardware wallet?
- Self-custody can reduce the risk tied to exchange failures or hacks, but XRP has specific considerations. The network requires a minimum address reserve, and destination tags matter when sending to exchanges. Verify all details carefully and always test with a small transfer first before moving a larger amount to your hardware wallet.
Sources
Author

Crypto analyst and blockchain educator with over 8 years of experience in the digital asset space. Former fintech consultant at a major Wall Street firm turned full-time crypto journalist. Specializes in DeFi, tokenomics, and blockchain technology. His writing breaks down complex cryptocurrency concepts into actionable insights for both beginners and seasoned investors.